

(update 10/11/2020)
Cells are building blocks for all living organisms, but they are small, range from 4 to 100 micrometer (10^-6 meter). We are not able to see them with our naked eyes; however, through the microscope, we can amplify the power to see these tiny cells. There are also many tiny creatures that we can not see with our naked eyes, such as Plankton and Bacteria.
I am a cell biologist and use microscopes to study the cells I am interested in. I am often amazed by the beauty of the tiny world that we are not able to see with our naked eyes. To see them, it does not require a big effort. My passion is to share many small lessons that you can do and get material from your daily life to enjoy seeing this beautiful tiny world.
Below is a length scale of biological objects and the types of microscopes and approaches to study them.

This article covers
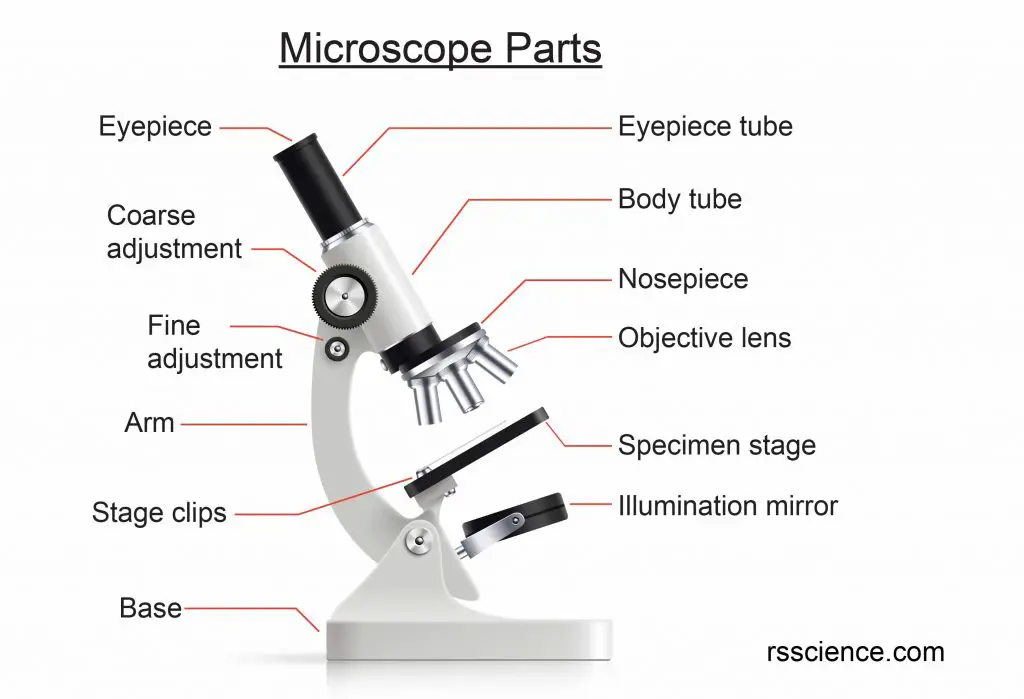
How to get started with a microscope?
- Turn the nosepiece so that the lowest power objective lens (e.g., 4x) is clicked into position.
- Before placing your slide, move the stage to the lowest point so the lens doesn’t hit your slide.
- Place the microscope slide on the stage and fasten it with the stage clips.
- Look at the objective lens and turn the coarse focus, so the stage moves upward. Be careful not to let the objective touch the coverslip.
- Look through the eyepiece and move the focus knob until the image comes into focus.
- Move the microscope slide around until the sample is in the center of the field of view.
- Use the fine focus to place the sample into focus and adjust the light intensity for the clearest image.
- When you have a clear image of your sample with the lowest power objective, you can change to the next (higher magnification) objective lenses.
- When finished, lower the stage, click the low power lens into position and remove the slide.
Tips for success in using a microscope
- Do not touch the glass part of the lenses with your fingers. Use only special lens paper to clean the lenses.
- Your microscope slide should be prepared with a coverslip over the sample to protect the objective lenses if they need to touch the slide.
- Clean the slides gently with a piece of lens cleaning paper to remove dust or fingerprints.
- Always keep your microscope covered when not in use.
- Always carry a microscope with both hands. Grasp the arm with one hand and place the other hand under the base for support.
Related posts
13 Tips You Should Know about Taking Care of Your Microscope
How to Use Microscope Immersion Oil to Get Higher Resolution Images
Microscopy stains
Microscopy stains enhance the visualization of cells and cell parts under a light microscope. They give images more contrast and allow cells to be classified according to their shape (morphology). By using a variety of different stains, you can selectively stain different areas of the cells such as cell walls, nuclei, or the entire cell. Some types of stains can also distinguish living vs. dead cells. Click the individual stains below for more details.
- Methylene Blue
- Eosin Y
- Bismarck Brown Y
- Janus Green B
- Neutral Red
- Gram’s Iodine Solution
- Copper(II) sulfate
- Copper(II) acetate
Hands-on microscope activities and lessons
Below is a list of topics on hands-on microscope activities and lessons.
Lesson 1: Prepare a Working Space and Protect Yourself
Lesson 2: Mount a Slide & “Look at Your Cheek Cells“
Lesson 3: Onion Dissection & “Look at the Plant Cells”
Lesson 4: How to Use a Microtome & “Amazing Cross-section of a Stem”
Lesson 5: How to Do Scale Casting with Clear Nail Polish & See “Microtopography”
Lesson 6: Pond Life Hunter & “A World in a Drop of Water”
Lesson 7: Grow Your Own Yeasts & Use a Hemocytometer to “Count Cell Density”
10 Everyday Things You Should Look at Under a Microscope
How to See Bacteria on Your Hand (Bacteria Handprint)
How to Find Tardigrades (Water Bears)
Observing chloroplast cytoplasmic streaming under a microscope
Cell biology and cell models
We find it is fun to build a cell model because it will deepen your understanding of cell biology. We have 5 posts that dictated cell model using food. We also introduce the function of each organelle as we go through what food to use for representation.
Animal Cell Model Part I – cell membrane, cytosol, nucleus, and mitochondria.
Plant Cell Model Part V – cell wall, vacuole, and chloroplast.
Common questions/FAQ about microscopy
What do I need to get started?
You need prepared microscope slides to explore.
There are lots of options available at Amazon, but they don’t come with a clear description of each anatomy or structure. You often don’t know what you are looking at except this one. This 25 prepared slide set provides the most comprehensive collection covered four major fields of biology: (1) Algae and fungi; (2) Plant kingdom; (3) Animal kingdom; (4) Human body.
It also comes with a colorful guidebook, showing the actual images under the microscope guiding you to learn biology at the cellular level, explaining what you expect to see in the slide, telling you the story behind the scientific discovery, and activities and questions for your to brainstorm.
What is the best accessory kit for making microscope slides?
If you want to make your own slide, you will need blank slides (of course), coverslips, tweezers, dissecting needles, pipets, absorbent pads, Petri dishes, gloves, lens papers, collection tubes, cotton-tipped applicators (normal and sterile packages), biology stains (eg, methylene blue and Eosin Y), tools (microtome for thin section). Woo, a lot of items. Don’t worry to buy them one by one. This accessory kit contains stuff all I mentioned above.
How to use coverslip to mount a slide?
Check out “how to mount a bubble-free slide“.
How to increase the resolution and the image clarity?
Make sure you clean your slide and get the right focus plane. In addition, when you are using high magnification (>100x), the microscope immersion oil will help. Check out” how to use microscope immersion oil“. The immersion oil can be found on Amazon.
What is compound microscope vs. stereo microscope?
The image below is a common setup for compound microscope vs. stereo microscope.

[In this figure] The compound microscope vs. stereo microscope.
Compound microscopes (also referred to as an upright light microscope) are probably the most common microscopes you can find. Because the light has to pass through the specimen, the ideal specimens for compound microscopes are small and thin stuff. Check out ” what can we see under a compound microscope“.
Stereo microscope can be used to view more substantial specimens such as insects, feathers, leaves, rocks, gems, coins, stamps, etc. Functionally, a stereo microscope is like a much powerful magnifying glass. Unlike a compound microscope that offers a flat image, stereo microscopes give the viewer a 3-dimensional image that you can see the texture of the specimen. In addition, you don’t have to make a microscope slide for the stereo microscopes. Check out ” what can we see under a stereo microscope“.
Other types of microscopes
Advanced Microscopy on the Frontier of Science
Fluorescent microscopes
Electron microscopes
Can You See Viruses Under a Microscope?
5 Science Facts Behind Astonishing Electron Microscope Images
The Last thing you need to know about microscopy
If you are a beginner, I recommend starting prepared slides to look under a microscope. These are professionally made slides, the cell structure and anatomy are well preserved and stained. You should be able to see the beauty and the detail of biology. I am sure that you will be amazed by the beauty of the tiny world, so delicate and so much fun! What is your first image of the tiny world? Please share it with us below!