
This article covers
What is fluorescence microscope?
A fluorescence microscope is an optical microscope that uses fluorescence instead of other light properties (such as scattering, reflection, and absorption) to generate an image. This category includes a simpler set up like an epifluorescence microscope and more complicated designs such as confocal, two-photon, and light-sheet microscopes.
What is fluorescence?
Before we learn how a fluorescence microscope work, we better quickly pick up what is “fluorescence”.
Fluorescence is an optical phenomenon in which the absorption of energy in the form of photons triggers the emission of fluorescent photons with a longer wavelength. Based on the properties of light, the longer wavelength is equal to lower energy. You can imagine that when light hits a material, this material absorbed the energy of light. A certain amount of energy loses within the material; then this material emits the rest of the energy in a form of light back (lower energy). The change of excitation (in) and emission (out) light’s spectrum is called “Fluorescence”.
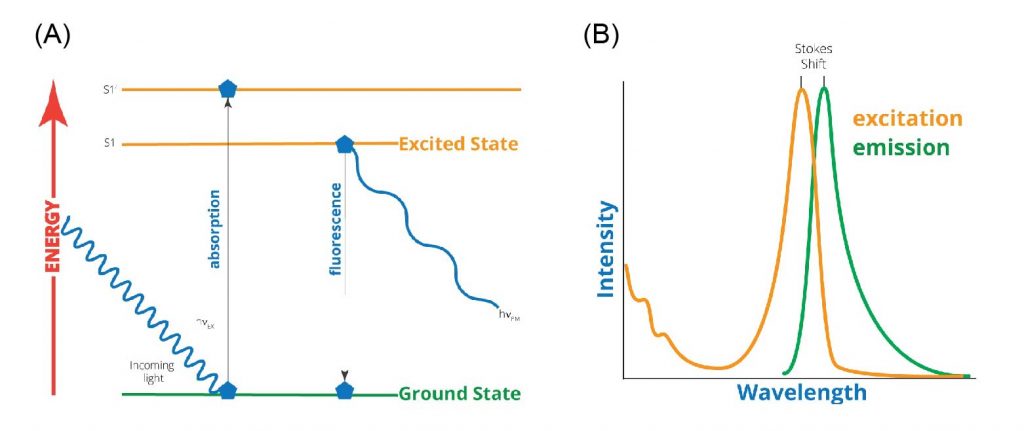
[In this figure] (A) The physics underlying fluorescence is illustrated by the electronic-state diagram (so-called Jablonski diagram). It starts by the absorption of higher photon energy by a fluorophore and subsequent emission of lower photon energy, resulting in fluorescence. (B) A typical excitation-emission diagram, showing the absorbance spectrum of a fluorophore at shorter wavelength (i.e. higher energy) and the resultant fluorescence spectrum of the emitted light at longer wavelength (i.e. lower energy state).
Photo source: World Precision Instruments
A great example of fluorescence is happening in black light theaters like Blue Man Group. The performers wear clothes painted with fluorescence dyes that absorb UV light (black lighting, which is invisible to naked eyes) and then emit visible light (blue, green, or red). These fluorescent chemical compounds are called “fluorophore”.
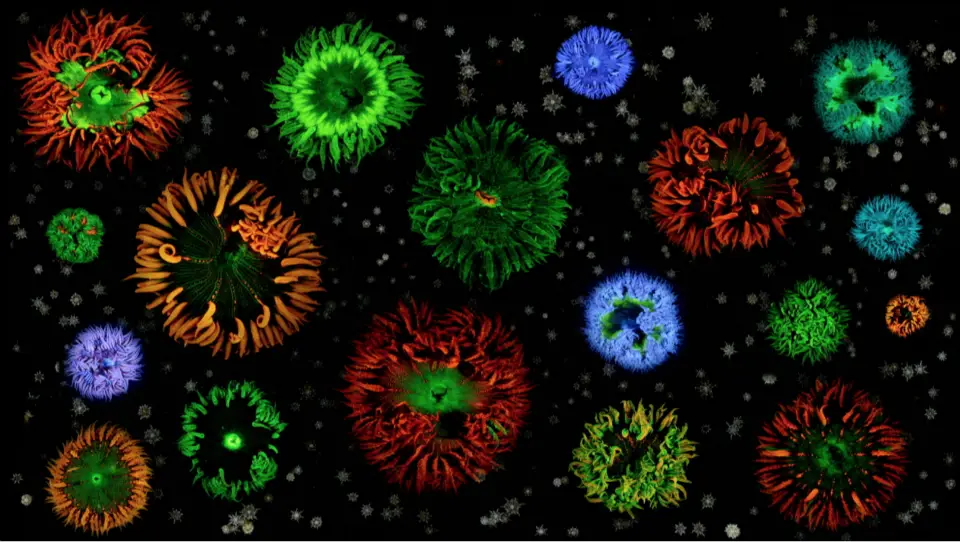
[In this figure] Coral with various colors of fluorescence.
Photo source: reefs.com
Fluorescence can also be frequently found in nature: in some minerals and in various parts of animals, like deep-sea fish, coral, and jellyfish. Scientists can even genetically engineer organisms to carry various fluorescent proteins.
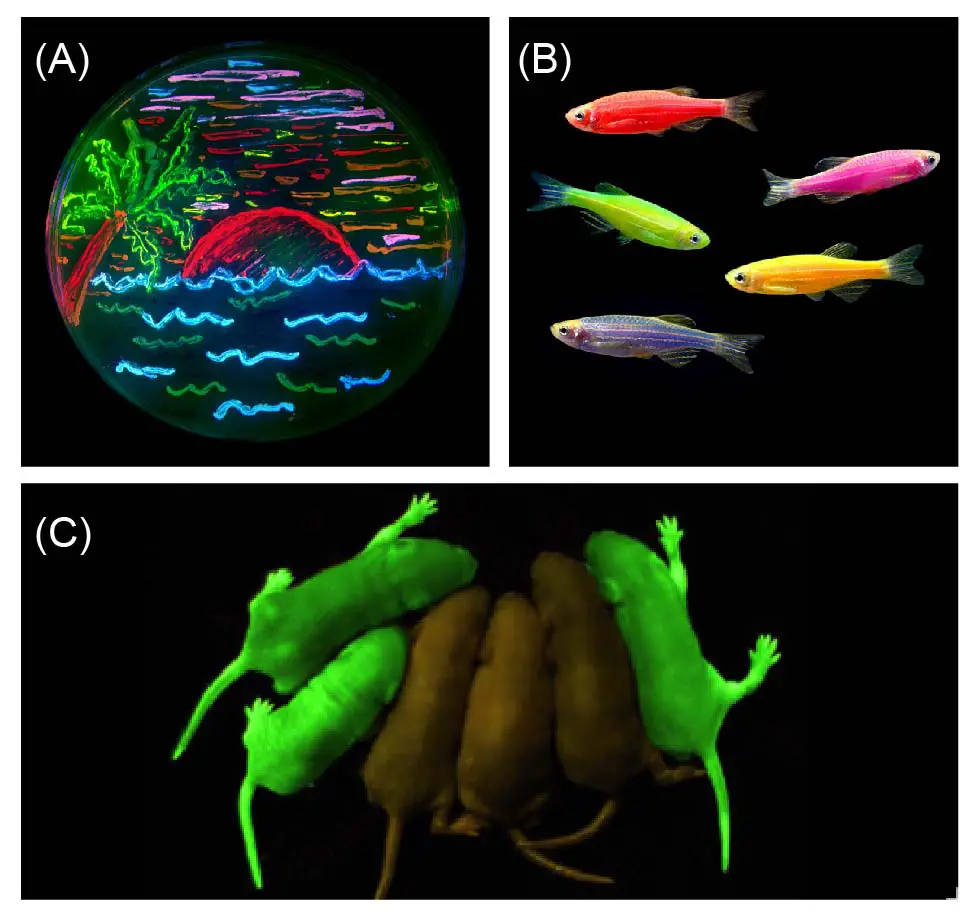
[In this figure] Genetically engineered fluorescent organisms.
(A) A paint on a petri dish by using living bacteria expressing 8 different colors of fluorescent proteins (from the lab of Roger Tsien). (B) GloFish, the first commercially available fluorescent pets created using biotechnology. (C) Mice with a green fluorescent protein (GFP) inserted into their genomes for neurology studies.
Photo source: wiki, Glofish, Proteopedia.
How does a fluorescence microscope work?
Once we know what is fluorescence, the principle of fluorescence microscope becomes simple. In order to detect the fluorescent light using an optical microscope, there are three steps:
I. The specimen is illuminated by light with a specific wavelength that is absorbed by the fluorophores, enabling them to emit light of longer wavelengths.
II. The illumination light can be separated (filtered out) from a much weaker emitted fluorescence through the use of a spectral emission filter.
III. The emitted illumination is collected by a camera or our eyes.
The majority of fluorescence microscopes, especially those used in the life sciences and biomedical researches, are epifluorescence microscopes. Their designs are shown in the diagram below.
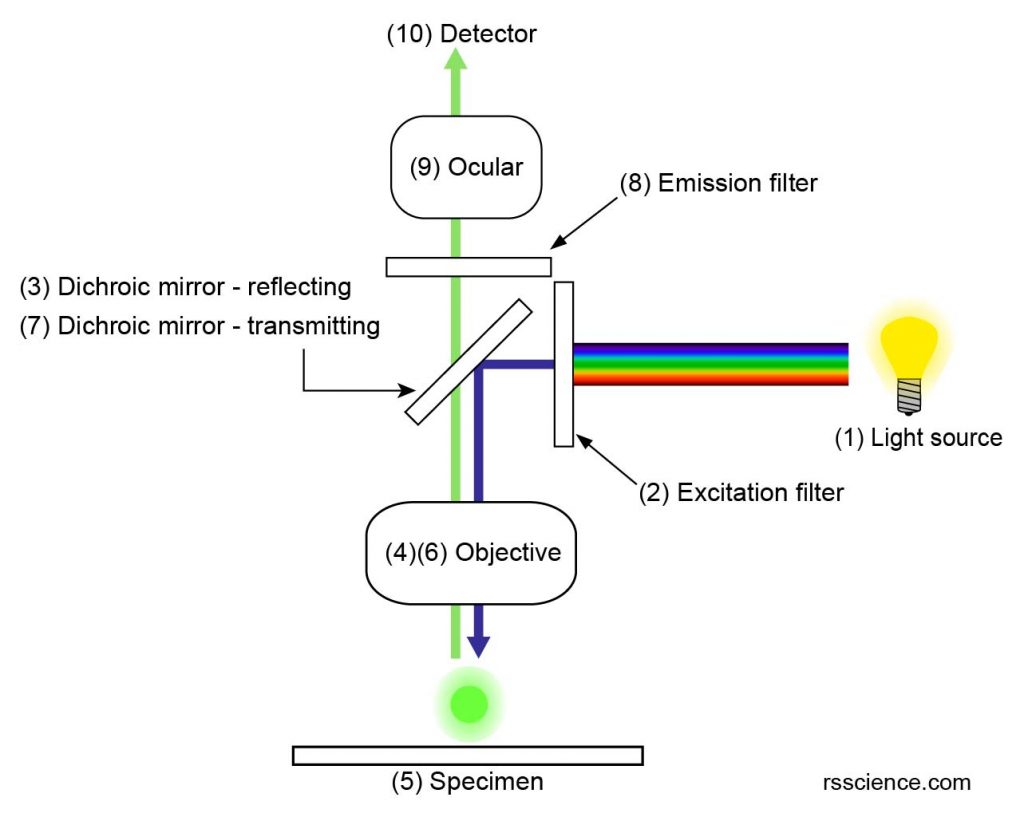
[In this figure] The optical path of an epifluorescence microscope.
Let’s look at the optical path of this epifluorescence design.
(1) Fluorescence microscopy requires an intense light source that halogen lamps cannot provide. Xenon arc lamps or mercury-vapor lamps are common, and more advanced forms are high-power LEDs or lasers.
(2) An excitation filter is used to select a specific excitation wavelength of light from a light source. For example, only “blue” light can pass through the excitation filter in this diagram.
(3) A dichroic mirror (or dichroic beamsplitter) can separate light by transmitting and reflecting light as a function of wavelength. The “blue” excitation light is reflected by a dichroic mirror toward the specimen.
(4) The “blue” excitation light passes through the objective lens.
(5) The “blue” excitation light illuminates the specimen. The fluorophores such as green fluorescent protein (GFP) emit “green” emission light.
(6) The “green” emission light goes back through the objective lens (same as regular optical microscope).
(7) The dichroic mirror allows the transmission of “green” emission light.
(8) An emission filter is used to filter out unwanted wavelengths of light.
(9) The “green” emission light passes through ocular lens to form an image.
(10) The final image is recorded by a detector (usually, a very sensitive camera).
What is the unique feature of fluorescence microscope images?
Based on the principle of fluorescence microscopy, you can see these unique features of fluorescence microscope images. Scientists can turn these unique properties of fluorescence microscopy into advantages to empower their researches:
Only matched fluorophores can be seen
You will see nothing (black background) but only the illuminated fluorophores that match the chosen excitation/emission spectrum. In this way, we can see very specific molecules in a mixture.

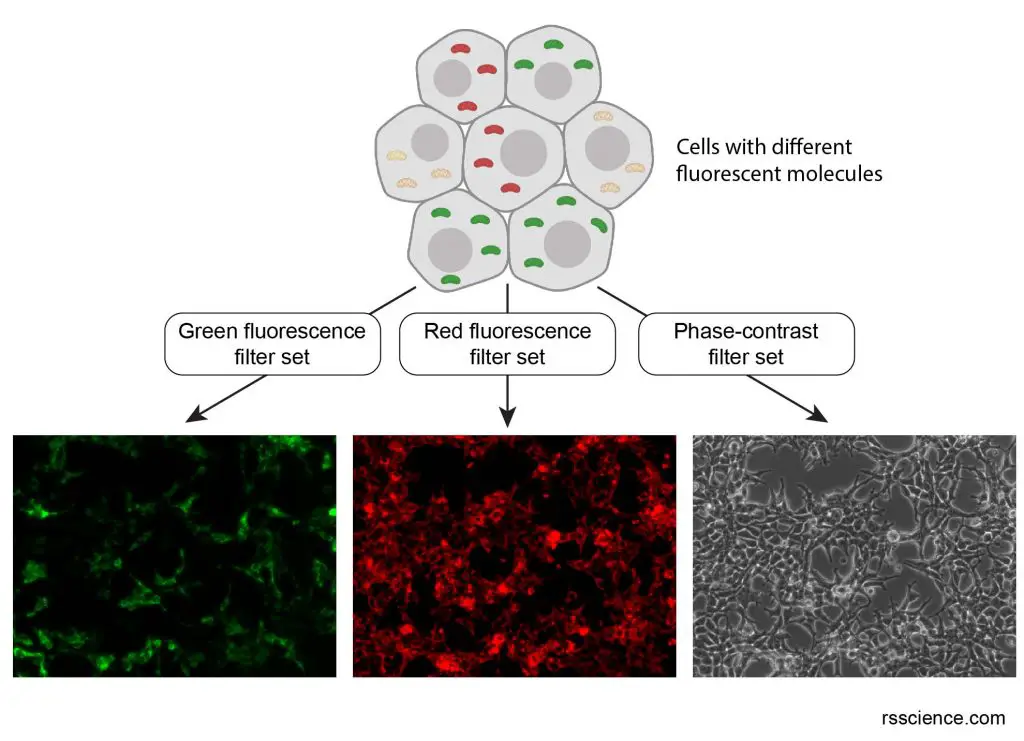
[In this figure] Phase-contrast and fluorescence microscope images of human cells in a petri dish.
An optical microscope with a phase-contrast filter set can reveal the overall morphology of cells. The fluorescence microscope can be used to detect the green fluorescent light emitted from green fluorescence proteins (GFP) in a small portion of cells. You can superimpose both into a composed image in computer software.
B. The excitation filter, dichroic mirror, and emission filter have to match the spectrum of fluorophore in the specimen
The filters and the dichroic mirror are chosen to match the spectral excitation and emission characteristics of the fluorophore used in the specimen. The excitation-emission filter set is commonly designed as a module. In order to look at different fluorescent colors, you need to switch to the right module.
[In this figure] An example of using different filter sets to view different fluorophores at the same location.
This is a mixture of two kinds of cells: one carrying green mitochondria and the other carrying red mitochondria. When you are using an excitation/emission (488/520 nm) filter set that is designed for green fluorescence, you don’t see any signal from red fluorophores (even they are also there). This brings a huge benefit for scientists to track specific kinds of proteins inside cells.
C. The images taken from a fluorescence microscope is “mono-” color
Since one filter module dedicates to one fluorophore, the distribution of a single fluorophore (color) is imaged at a time. In this manner, the raw image taken from a fluorescence microscope is monocolor (black and white). Multi-color images of several types of fluorophores must be superimposed by combining several single-color images.
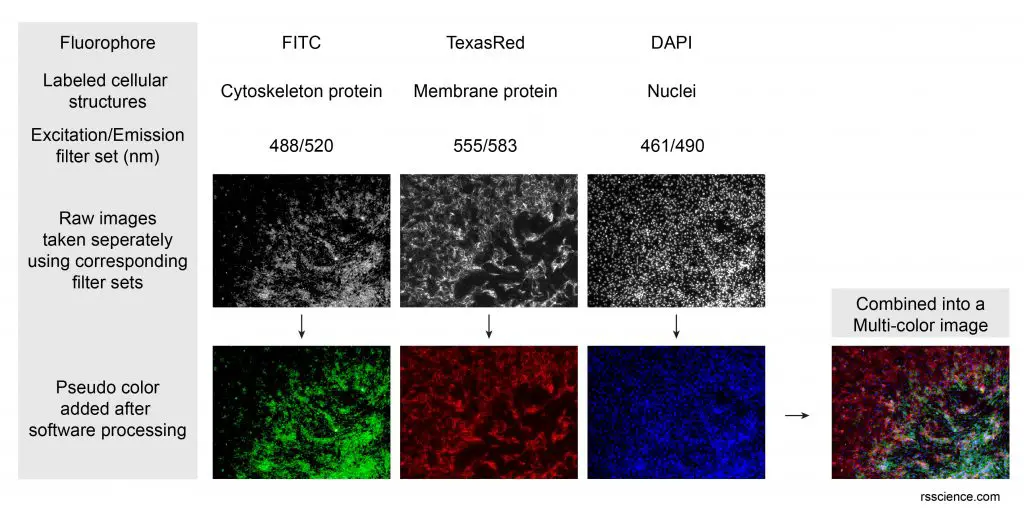
[In this figure] An example of multi-color image generated by the combination of three individually taken fluorescence images. This technique (called co-localization) is very useful in biomedical researches to study the interactions between different proteins.
Sample preparation is key for the fluorescence microscopy
What is a good sample for fluorescence microscopy? It must be fluorescent. There are several methods to create a fluorescent sample:
A. Biological fluorescent stains
Many fluorescent molecules have been designed to stain a range of cellular structures and biological molecules. Some of these are small molecules that are intrinsically fluorescent and bind to a biological molecule of interest. For example, DAPI and Hoechst (excited by UV wavelength light) are nucleic acid dyes that bind strongly to DNA, thus labeling the nuclei of cells. Another example is phalloidin, originally a toxin from death cap mushroom. Phalloidins are modified by adding a fluorophore to stain cytoskeleton actin filaments.
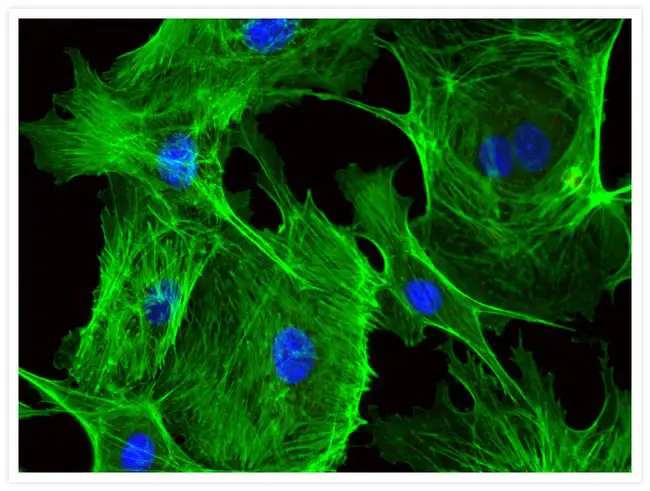
[In this figure] Blood vessel cells (endothelial cells) stained with Alexa Fluor® 488 phalloidin (green) and DAPI (blue).
Alexa Fluor® 488 is a wildly used fluorophore that can be chemically added to other molecules and proteins.
Photo source: ThermoFisher Scientific
B. Immunofluorescence
Immunofluorescence is a technique that uses the specificity of an antibody to its antigen to label specific proteins or other molecules within the cell.
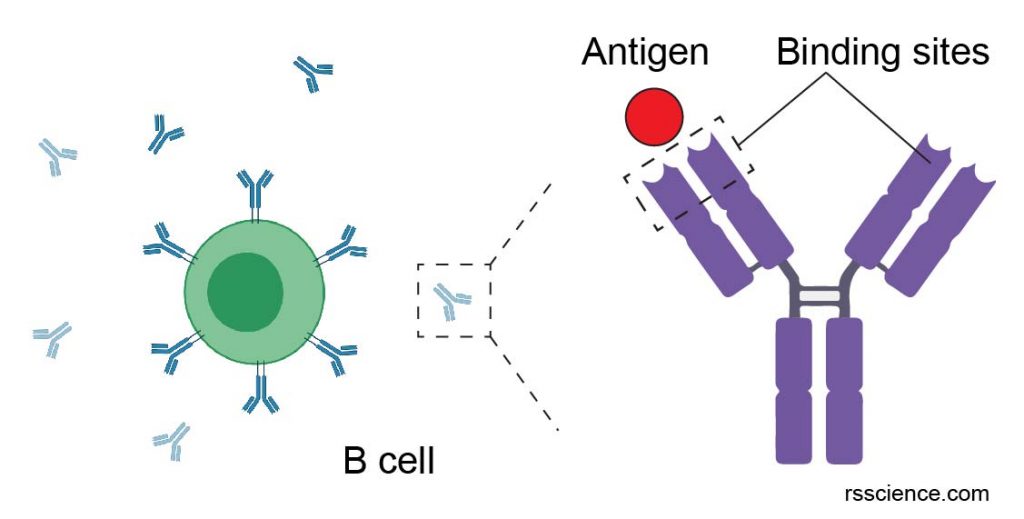
[In this figure] Antibody is a type of proteins produced by B cells in our immune system.
An antibody can specifically bind to a matched antigen. For example, an antigen could be a component of bacteria. The binding of antibodies to the antigen can eliminate the sources of antigens from our bodies.
Created with BioRender.com
Immunofluorescence steps
A specimen is treated with a primary antibody specific for the molecule of interest (antigen). Next, a secondary antibody that binds to the first antibody specifically is added. A fluorophore is usually conjugated on secondary antibodies for imaging. Typically, multiple secondary antibodies can bind to one primary antibody, resulting in the great amplification of fluorescent signals.
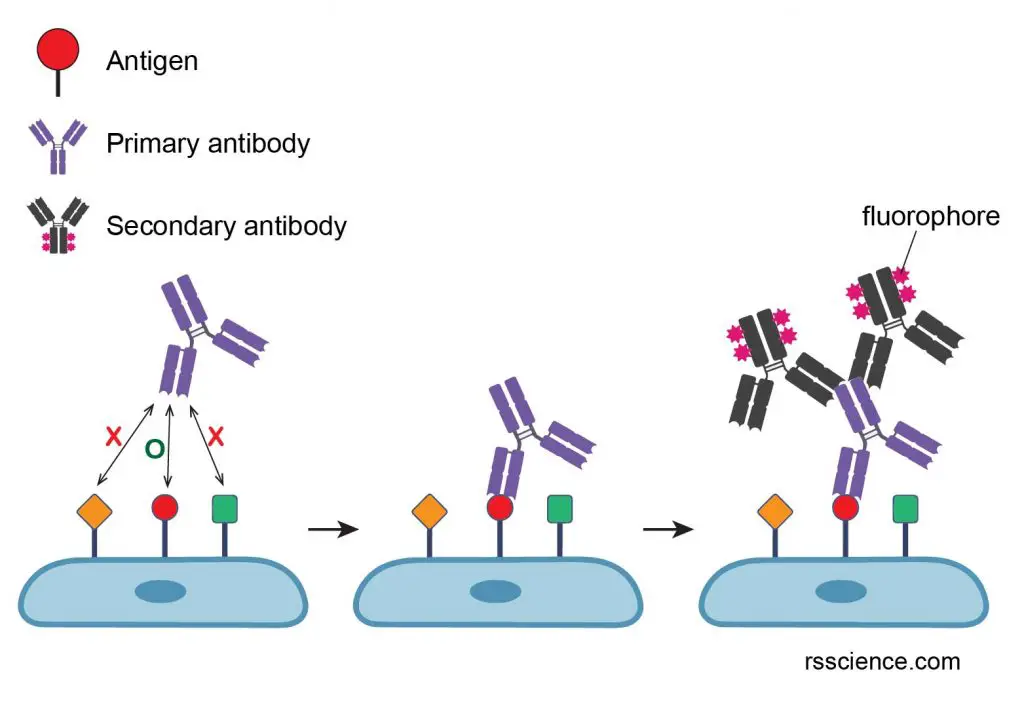
[In this figure] The procedure of immunofluorescence staining.
The primary antibodies look for and bind to their matched antigens. Next, a secondary antibody that binds specifically to the primary antibody (the primary antibody is the antigen of the secondary antibody) is added into the reaction.
C. Fluorescent proteins
The advance of modem biotechnology allows scientists to engineer proteins genetically so that an organism is able to carry a fluorescent protein. This principle allows scientists to directly make a protein of interest fluorescent. The localization of the protein inside the cells can be directly tracked, including in live cells. In contrast, immunofluorescence staining usually requires the fixation of cells, which kills the cells by using chemicals.
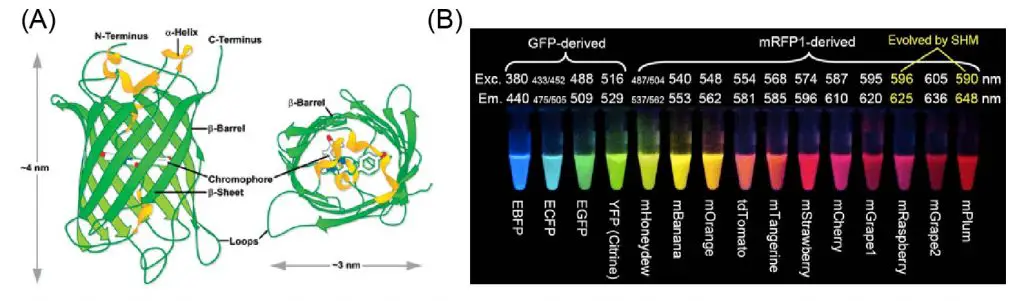
[In this figure] (A) The protein structure of the green fluorescent protein (GFP). GFP is the most famous fluorescent proteins. It was isolated from the jellyfish Aequorea Victoria. (B) The collection of fluorescent proteins for various colors. Many of these fluorescent proteins were derived from the mutations of the original GFP. Scientists Roger Y. Tsien, Osamu Shimomura, and Martin Chalfie were awarded the 2008 Nobel Prize in Chemistry for their discovery and development of the green fluorescent protein.
Photo source: Chem Soc Rev, Exploreable
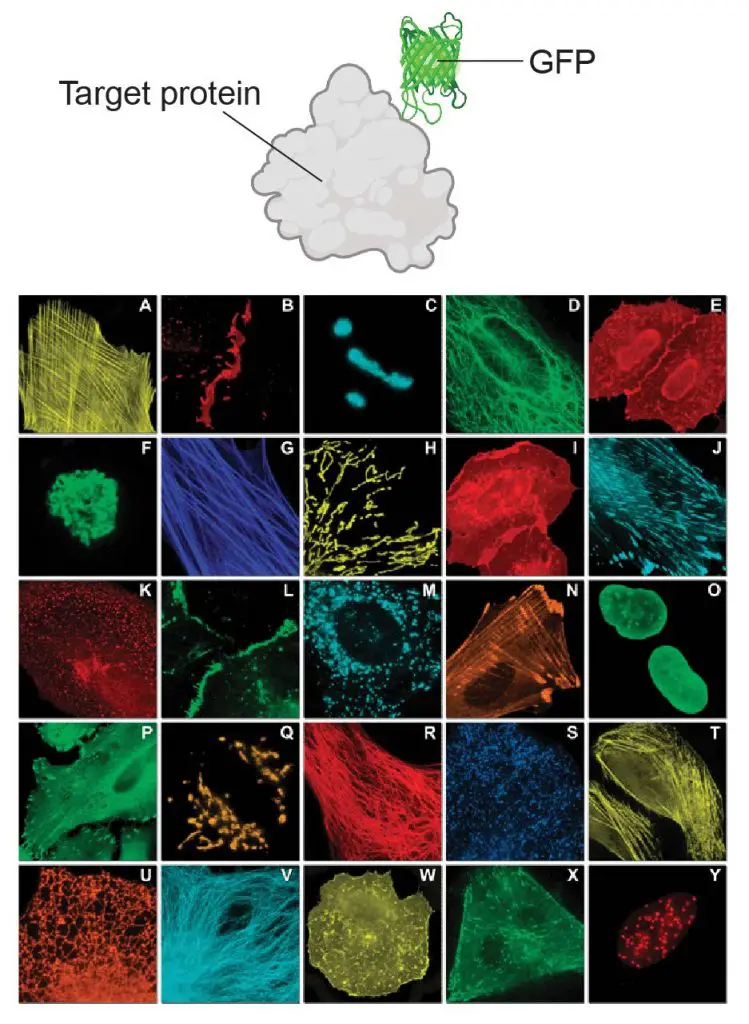
[In this figure] Genetic editing of DNA generates “fusion proteins” by adding GFP like a tag to the proteins of interest. Using this technique, scientists can study various targets (protein of their interests) in subcellular locations.
Photo source: Chem Soc Rev
Disadvantage of fluorescence microscopy
Although the fluorescence microscopy is a powerful technique behind many important discoveries in life sciences and biomedical researches, there are limitations:
A. Photobleaching
Fluorophores lose their ability to fluoresce as they are illuminated over a period of time, a process called photobleaching. Photobleaching occurs as the fluorescent molecules accumulate chemical damage due to the absorption of energy. Photobleaching can severely limit the time of viewing a sample through fluorescence microscopy.
B. Limitation of viewing multiple targets at the same time
The windows of the fluorescence spectrum are limited. A typical fluorescence microscope may only have three filter sets for green, red, and blue fluorescence. In addition, two fluorophores can’t be used together if their excitation/emission spectrum are overlapped or too close. For immunofluorescence, the availability of antibodies (both primary and secondary ones) could also limit how many colors could be viewed in the same specimens.
C. Diffraction limit
The wave nature of light limits the size of the spot to which light can be focused due to the diffraction limit. Like other optical microscopes, the resolution of fluorescence microscopy is still governed by the nature of light (resolution to approximately half of the wavelength of the light used).
Recently, several improvements in microscopy techniques have resulted in increased resolution and contrast to some extent. Examples include two-photon excitation microscopy and stimulated emission depletion (STED) microscopy. We will discuss the advanced microscopy in our future articles.
D. Expensive
Compared to compound or stereo microscopes, fluorescence microscopes are still pretty expensive (>10,000 USD). This is not surprising because a fluorescence microscope is much more complicated. If you are interested in fluorescence microscopes, pay attention to the Open House or Scientific events in your local universities or research institutes.
Reference
“Ca2+ Detection in Muscle Tissue using Fluorescence Spectroscopy”
“The fluorescent protein palette: tools for cellular imaging” Richard N. Day and Michael W. Davidson