

We have a series of posts covering all the aspects of microscopes.
I. Background and Introduction
- What is a Microscope? – Function and Magnification
- Who Invented the Microscope? – History of Microscopy
- Different types of microscope
II. Components of a Microscope
III. Specialized Microscopes
IV. Practical Guides to Work with Your Microscopes
This article covers
There are many different types of microscopes, and some are pretty COOL!
Microscopes had become an essential instrument in modern technology. At the same time, scientists never give up inventing new types of microscopes and push our limit to see invisible things.
In this article, we will introduce all different types of microscopes to you.
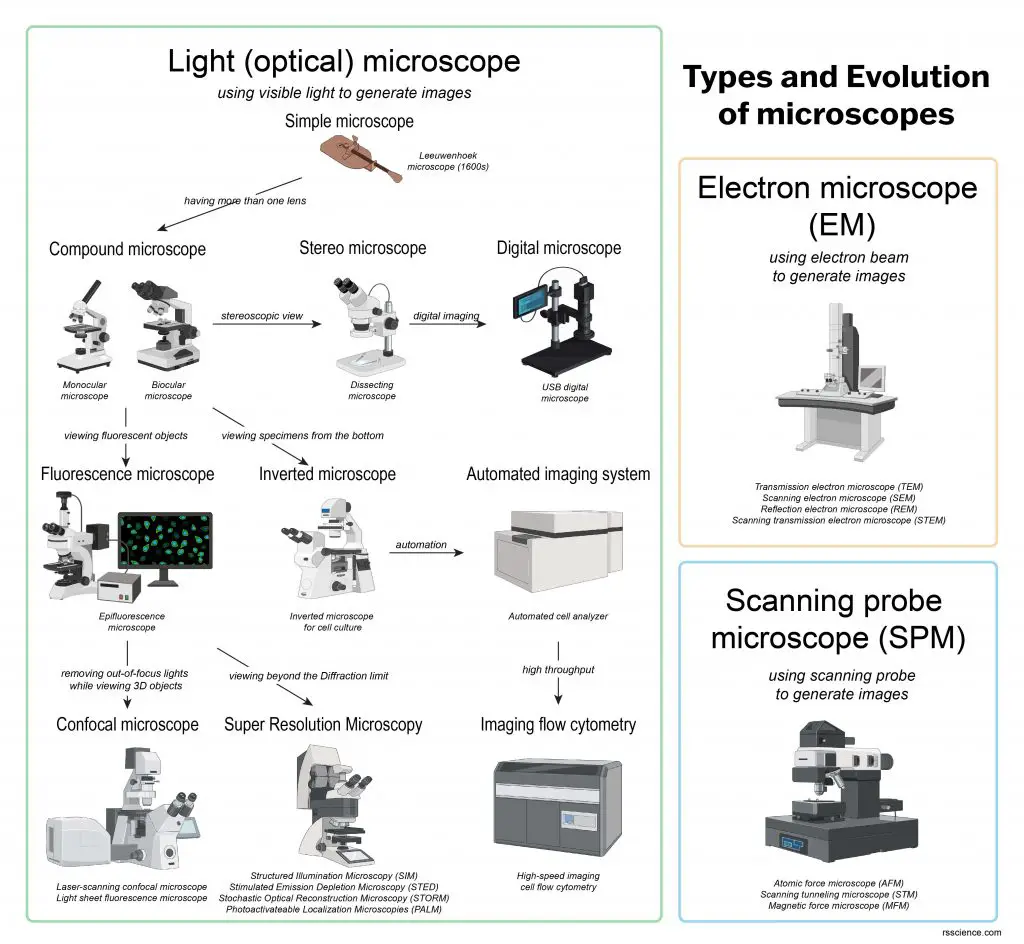
[In this figure] The overview of current microscopies.
Based on the principle to generate images, they can be classified as light (optical), electron, and scanning probe microscope.
Light microscopes become a very powerful tool
About 500 years ago, Antonie van Leeuwenhoek (1632-1723) and Robert Hooke (1635-1703) led us into the microscopic world with their microscopes (in their time, it is the most advanced “high tech”). After that, optical microscopy by using visible light as the illuminating source quickly advanced.
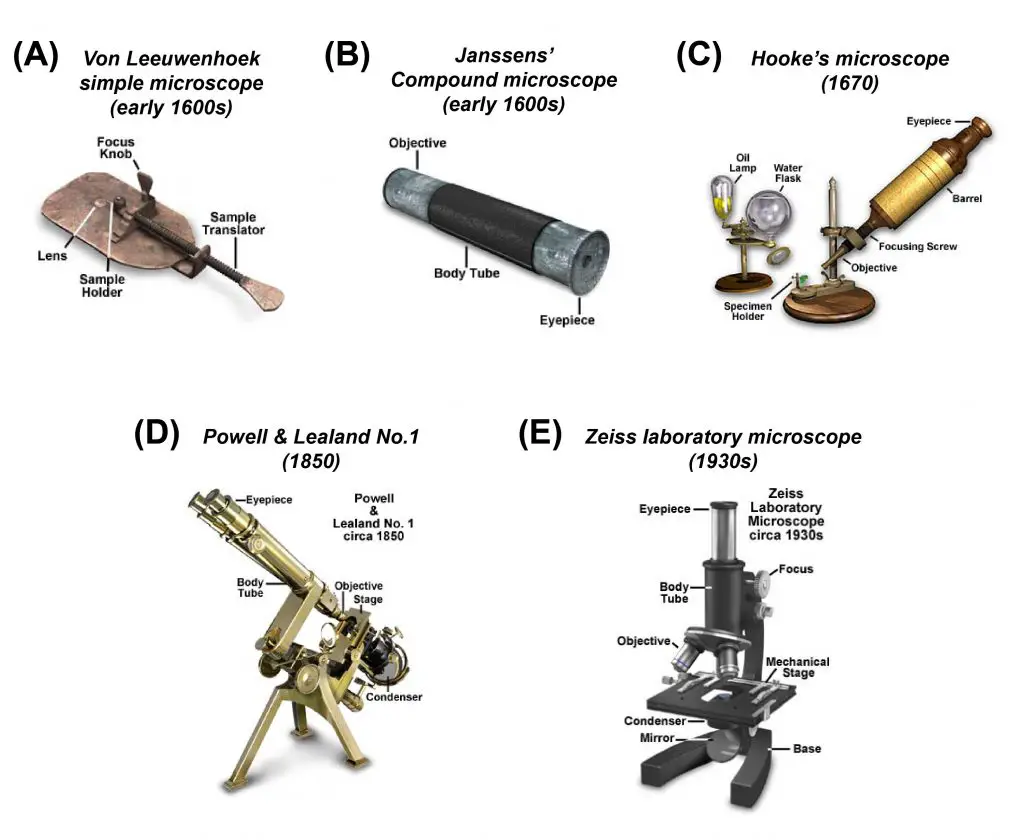
[In this figure] A review of “antique” microscopes that played important roles in modern technology development. If you want to know more about their stories, check our article “ Who invented the Microscope? – History of Microscopy”.
Photo credit: Olympus.
Today, the family of microscopes was significantly expanded. In the family tree of an optical (or light) microscope, the principle is still the same: “generating the magnified images through the interaction of visible lights and the subjects.” However, scientists had made tremendous progress to see more specific (such as fluorescence light), deeper (such as the 3D image of cells and tissues), faster (such as automated system), and even smaller (such as beyond the diffraction limit of light).
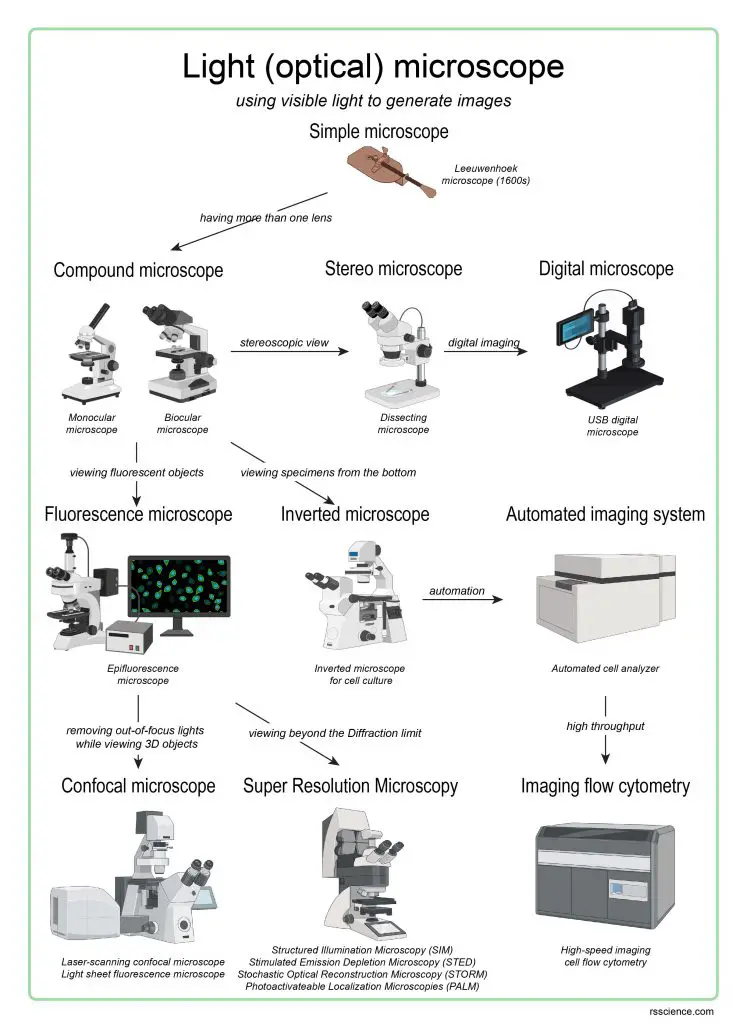
[In this figure] The family tree showing the evolution of light (optical) microscopes.
Compound microscopes evolved into various descendants
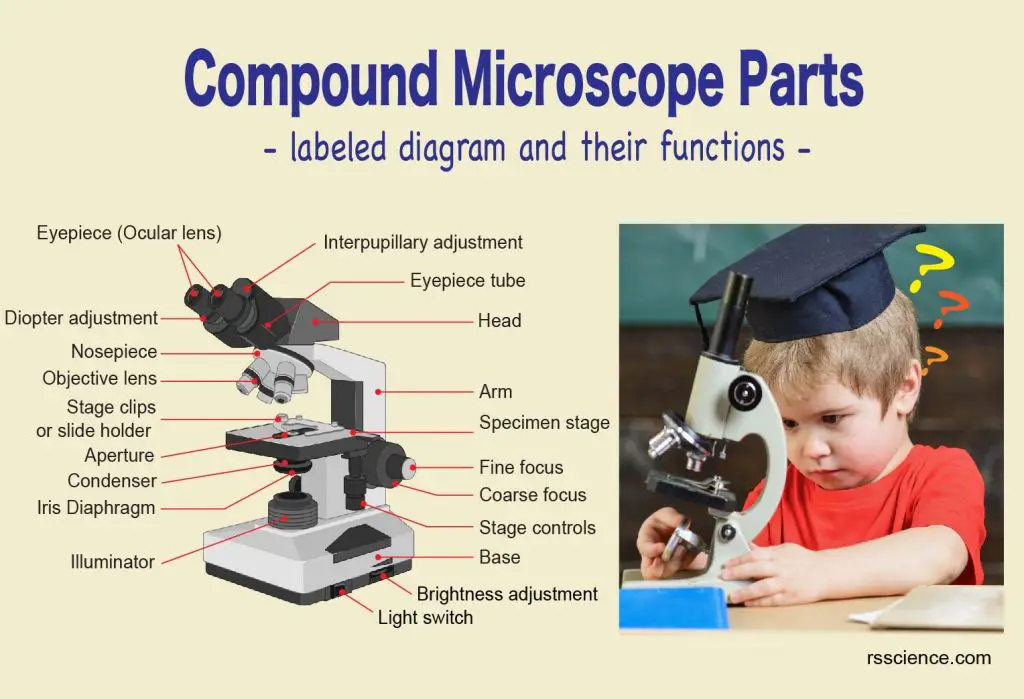
[In this figure] Labeled diagram shows the parts of a compound microscope.
Compound microscopes (also referred to as an upright light microscope) are probably the most common microscopes you can find. The term “compound” refers to the microscope having more than one lens. Basically, compound microscopes generate magnified images through an aligned pair of the objective lens and the ocular lens. Typically, a compound microscope is supplied with 3-5 objective lenses that range from 4x to 100x (4x/10x/40x/63x/100x). Assuming you have 10x eyepieces and 100x objective, the total magnification of this combination is 1,000x (10×100 = 1000).

[In this figure] Looking at the same specimen from low to high magnifications.
The top raw is a series of images of Vicia (pea family) root tip. At low magnifications (5x and 10x), you can have the overall view of the entire specimen. By getting closer (with higher magnification), you will start to notice the cells and their nuclei (blue dots). At high magnifications (63x and 100x with lens immersion oil), you can see some nuclei looked different from others. These spindle-shaped nuclei are dividing (or under mitosis) and their chromosomes (bundles of DNA) are moving apart.
The ideal specimens for compound microscopes are small and thin stuff because the light has to pass through the specimen. Compound microscopes have a much higher power of magnification to see the details of a subject; therefore, compound microscopes are also known as high power microscopes. Below are a few images taken by compound microscopes.
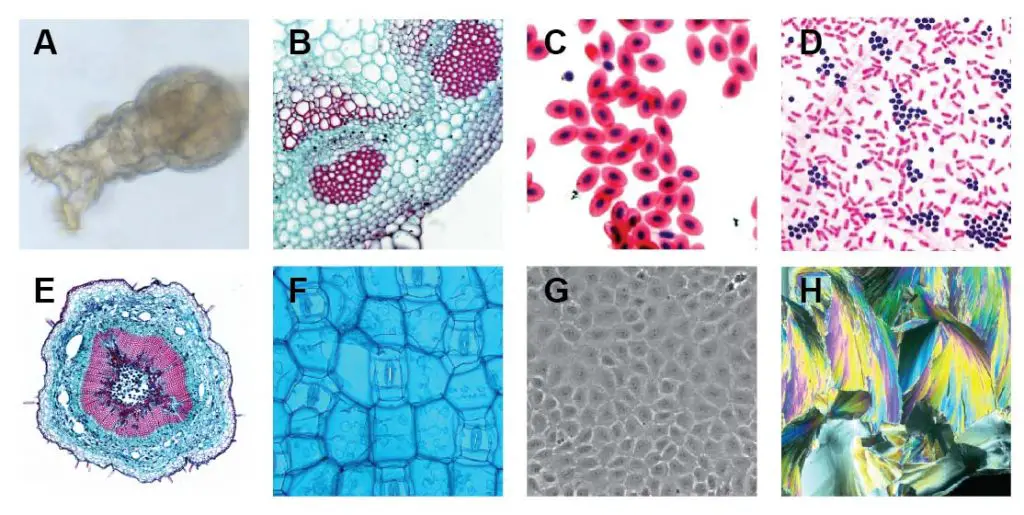
[In this figure] Images were taken by compound microscopes.
A. Rotifer (bright field); B. Helianthus stem (thin stained section – bright field); C. Fish red blood cells (Stained – bright field); D. Bacteria (Gram’s Iodine stained – bright field); E. Loosen stem (thin stained section – bright field + image stitching); F. Rhoeo Discolor leaf (bright field + blue filter); G. Human cells cultured in Petri dish (phase contrast); H. Citric acid micro-crystal (polarized light).
The basic compound microscope provides a versatile platform to develop many other types of light microscopes. By using special condensers, compound microscopes can also achieve darkfield, phase contrast, polarized light, and differential interference contrast (DIC) images for particular applications. Using different light sources, compound microscopes can be modified to view fluorescence, infrared light, ultraviolet light, and even X-ray.
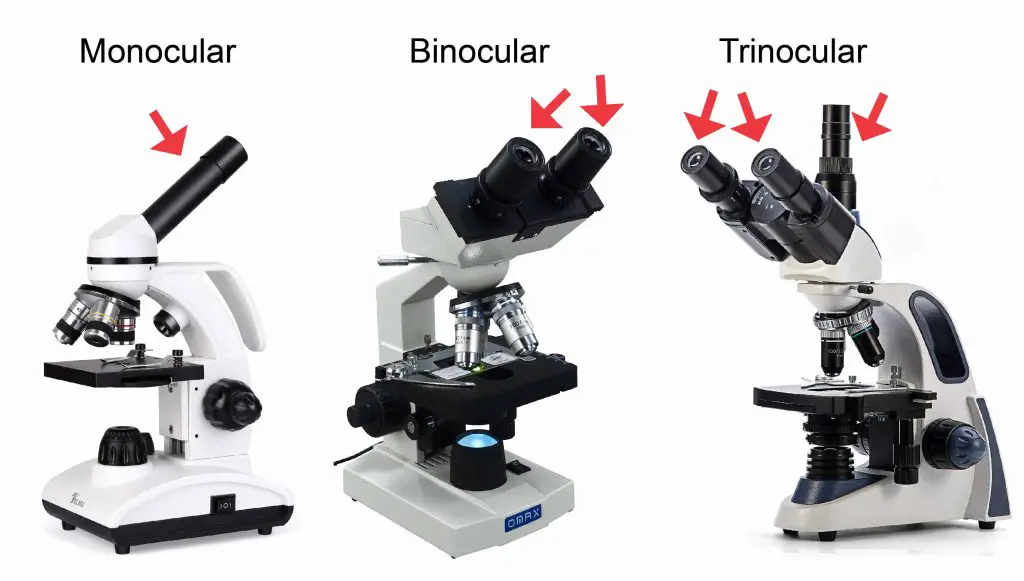
[In this figure] Compound microscopes can be designed for different purposes. For example, a monocular microscope has only one eyepiece and is usually low-priced. The binocular microscope allows you to see with both your eyes and is suitable for students. A trinocular microscope has an additional third eyetube for connecting a microscope camera.
For more information about how to choose a compound microscope, check our blog below.
Stereo microscopes show you a stereoscopic microworld
Stereo microscopes are branched out from other microscopes for the application of viewing “3D” objects. These include any more substantial specimens, such as insects, feathers, leaves, rocks, sand grains, gems, coins, and stamps, etc.
Functionally, a stereo microscope is like a more powerful magnifying glass. Unlike a compound microscope that offers a flat image, stereo microscopes give the viewer a 3-dimensional image that you can see the texture of the specimen.
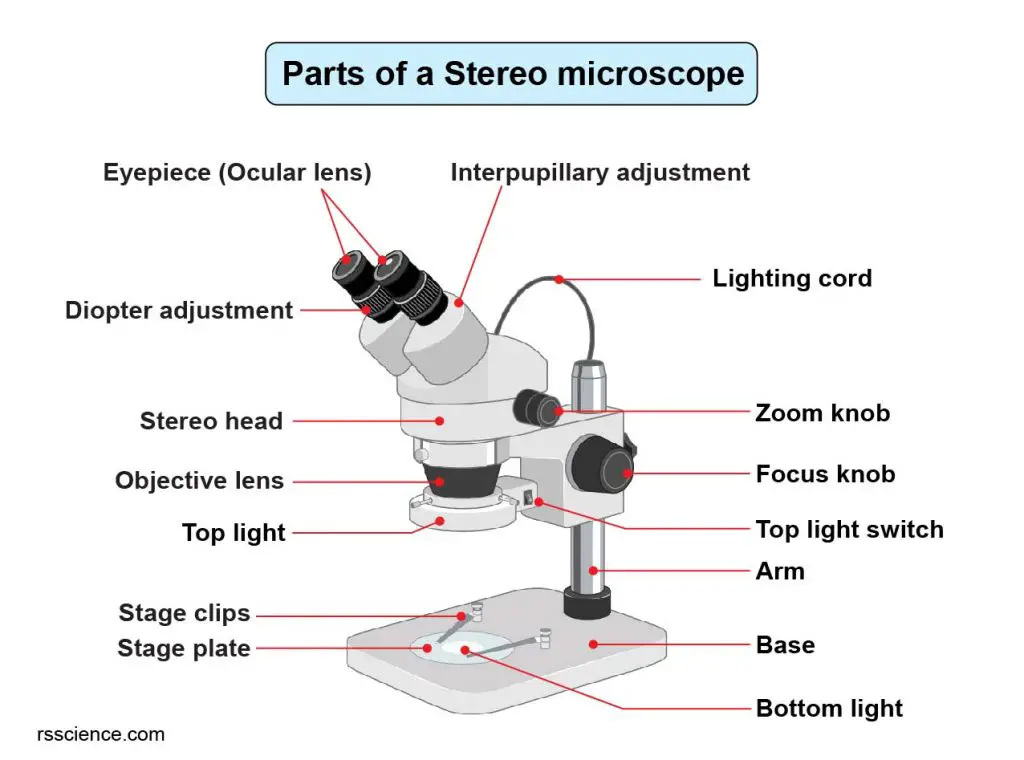
[In this figure] Labeled diagram shows the parts of a stereo microscope.
The name “stereo” comes from the term “stereoscopic,” meaning using two different viewing angles to create an impression of depth and solidity. Therefore, true stereo microscopes only come in binocular and trinocular styles. Besides, unlike a compound microscope that can only see a very thin specimen, stereo microscopes can be used for viewing almost anything you can fit under them. However, stereo microscopes offer lower magnification, typically 6.5x-45x. Below is an example showing the difference between viewing by compound vs. stereo microscopes.
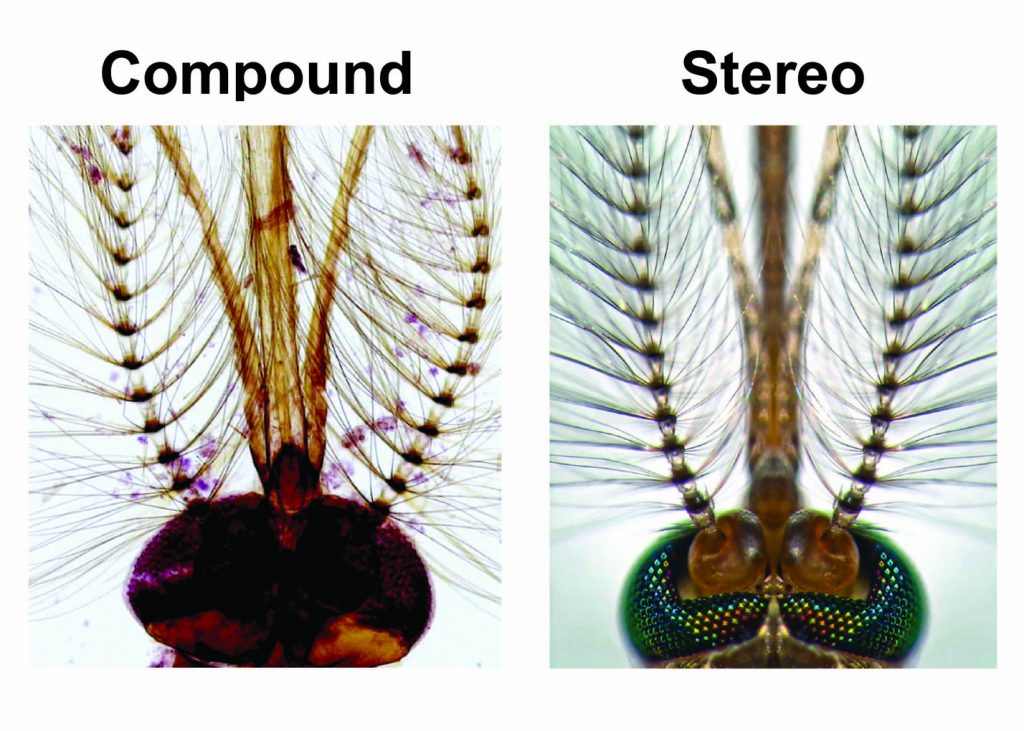
[In this figure] Mosquito head under compound and stereo microscopes.
A stereo microscope allows you to see the surface of specimens with a 3-dimensional view. Under a stereo microscope, you can see the metallic texture and colors of the mosquito’s compound eyes. In contrast, the light has to pass through the specimen to form the image under a compound microscope. In this case, the region of compound eyes is too thick to form a clear image.
Right Image credit: Dr. Gareth Paul Jones, 2013 Photomicrography Competition, Technique: Stereomicroscopy, Fiber Optic Illumination. Magnification: 70x.
Digital microscopes offer convenience and high-quality images
Microscopes are complex tools and may not be very friendly for beginners. The good news is that we now can easily buy and play with a digital microscope!
Recent advances in digital technology lead to digital microscopes, which have become essential tools in research, education, and medical practice. Generalized digital microscopes may include any microscopes integrated with a digital device, for example, adding a digital camera to a regular microscope. In most cases, digital (or USB) microscopes have become a term to describe the compact microscopic imaging cam like the products below.

[In this figure] Examples of commercial digital (or USB) microscopes.
Photo credit: Amazon.
Functionally speaking, digital microscopes give you images similar to the ones from traditional stereo microscopes. They are ideal for viewing insects and rocks. These digital microscopes also have great advantages for outdoor and field studies.
Both stereo and digital microscopes allow users to manipulate the objects under microscopic views. You may find many applications such as dissecting, micro-surgery, miniature manufacturing, and micro-engraving.
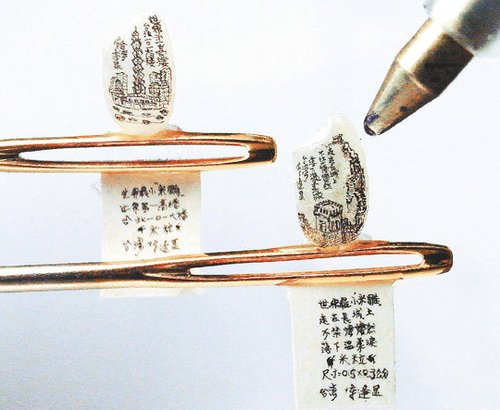
[In this figure] Micro-engraving on rice grains.
Inverted microscopes turn upside down
Inverted microscopes are compound microscopes designed upside down. Traditional compound microscopes are sometimes described as upright microscopes.
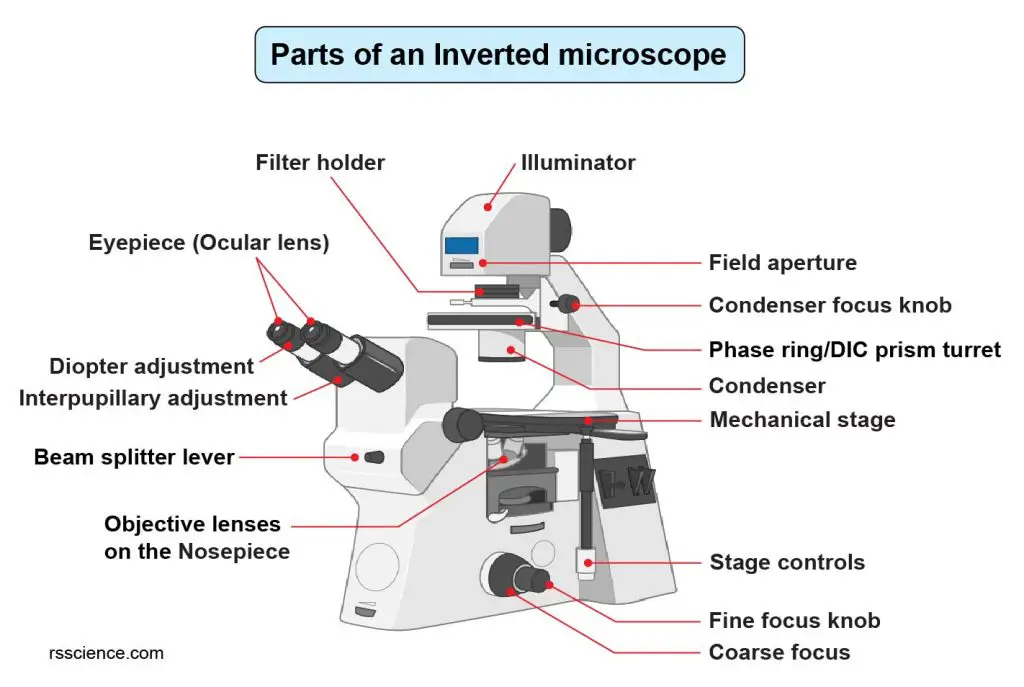
[In this figure] Labeled diagram shows the parts of an inverted microscope.
An inverted microscope has an objective lens below the specimen stage and its light source and condenser on the top. Inverted microscopes are useful for observing living cells or organisms at the bottom of a container (e.g., a Petri dish or tissue culture flask). Some inverted microscopes are even equipped with a chamber to maintain temperature and oxygen under more natural conditions to allow live-cell imaging over a long period of time.
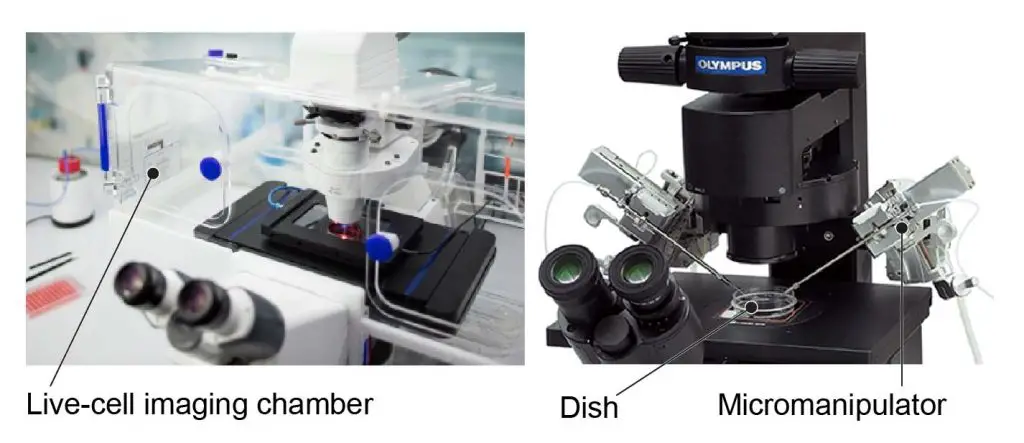
[In the figure] Modified inverted microscopes. Left: An inverted microscope equipped with a chamber (controlling temperature, humidity, and CO2 lever) for live-cell imaging. Right: A special inverted microscope with two micromanipulators that can perform microinjection for In vitro fertilization (IVF).
Photo credit: Zeiss and Olympus
[In this video] The growth of mouse cells (NIH-3T3) in a tissue culture flask was observed over 64 hours through live imaging.
Fluorescence microscopes illuminate the invisible microworld
A fluorescence microscope is an optical microscope that uses fluorescence instead of other light properties (such as scattering, reflection, and absorption) to generate an image.
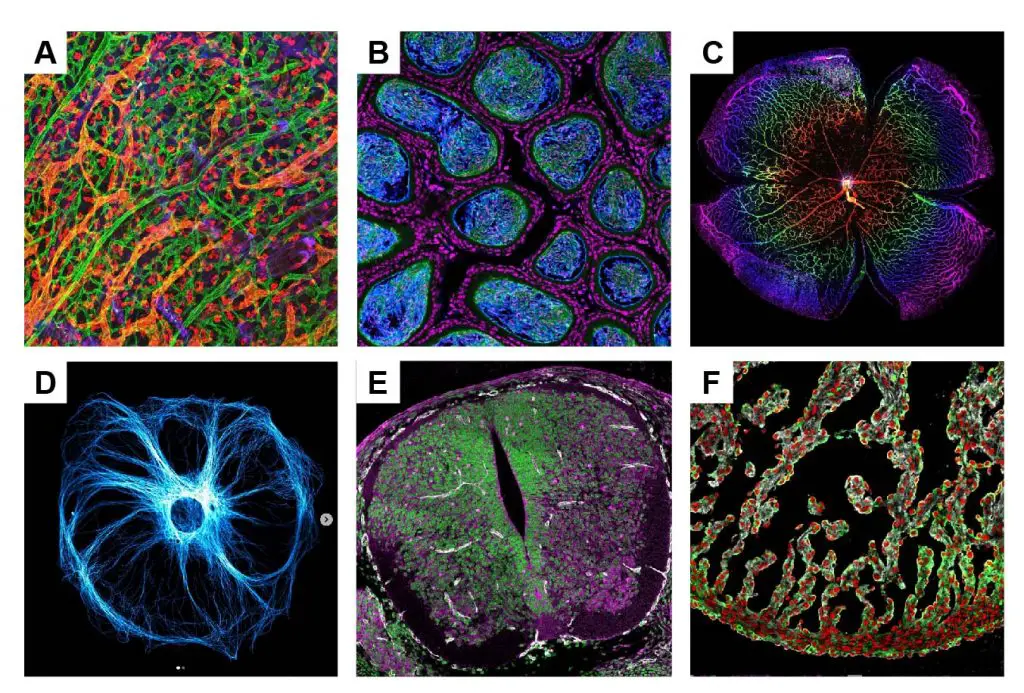
[In this figure] Astonishing fluorescence microscopic images of beauty: (A) Lymphatic and blood vessels under the skin; (B) Testicle tissue; (C) Blood vessels on a retina; (D) A cell with labeled cytoskeleton; (E) Neural cells in a spinal cord; (F) Heart cells in a developing heart.
Photo credit: linktr.ee/immunofluorescence
Fluorescence is an optical phenomenon in which the absorption of energy in the form of photons triggers the emission of fluorescent photons with a longer wavelength. Based on the properties of light, the longer wavelength is equal to lower energy. You can imagine that when light hits a material, this material absorbed the energy of light. A certain amount of energy loses within the material; then, this material emits the rest of the energy in the form of light back (lower energy). The change of excitation (in) and emission (out) light’s spectrum is called “Fluorescence.”
Fluorescence microscopes allow us to look at a particular fluorophore that has a specific spectrum. The combination of fluorescence microscopes and biochemical staining has become a very powerful tool for biomedical research. For example, by using the specificity of an antibody to its antigen to label specific proteins or other molecules within the cell (a technique called Immunofluorescence), scientists can study all kinds of bio-molecules that are usually invisible to regular light microscopes. Many ongoing researches that help us to cure diseases, such as diabetes, heart attack, and cancers, use this tool to see what is wrong inside the cells at a molecular scale.
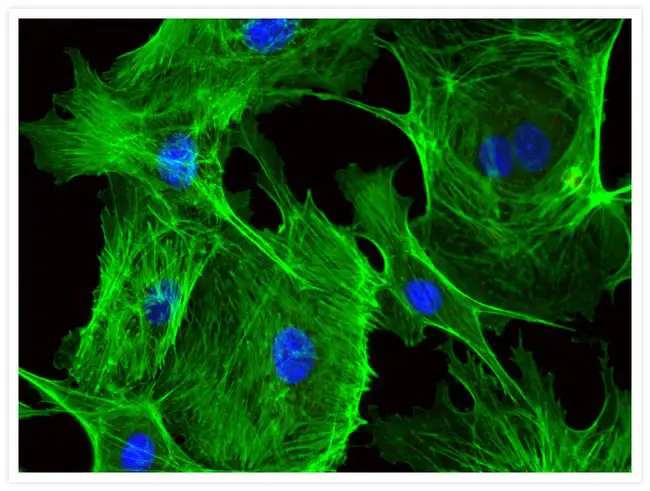
[In this figure] Blood vessel cells (endothelial cells) stained with Alexa Fluor® 488 phalloidin (green) and DAPI (blue).
Alexa Fluor® 488 is a wildly used fluorophore that can be chemically added to other molecules and proteins.
Photo source: ThermoFisher Scientific
Check our article about the principle of Fluorescence microscope.
Confocal microscopes let you see through a laser eye
Confocal microscopy, most frequently called confocal laser scanning microscopy (CLSM), is an optical imaging technique on fluorescence microscopes. Confocal microscopy solves a big problem of light microscopy: a blurry image caused by the light from off-focus parts when you are viewing a thick specimen. In a fluorescence microscope, the entire specimen is illuminated evenly. All parts of the sample can be excited simultaneously, and the emission fluorescence is detected by the microscope’s camera, including a large unfocused background part.
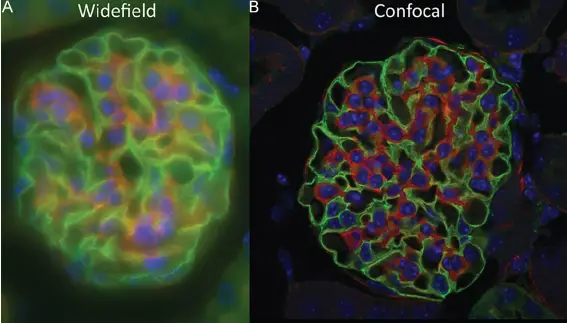
[In this figure] An example showing the power of confocal microscope.
A confocal microscope enables optical sectioning in thick specimens by removing the out-of-focus blur. This 15 µm thick mouse kidney tissue was imaged on both (A) a widefield and (B) a laser-scanning confocal microscope.
Photo credit: Jonkman J et al., Methods Cell Biol. 2014
In contrast, a confocal microscope uses point illumination (by focused laser beam) and a pinhole in an optically conjugate plane in front of the detector to eliminate out-of-focus signal – the name “confocal” stems from this configuration. As a result, only light produced by fluorescence very close to the focal plane (in focus) can be detected.
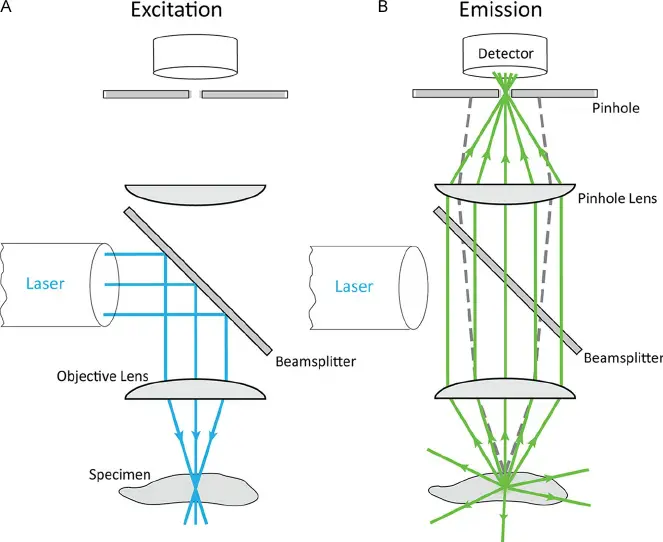
[In this figure] The confocal principle.
Fluorescence that originates from outside the focus is blocked by the pinhole. Therefore, out-of-focus blur is largely removed.
Photo credit: Jonkman J et. al., Methods Cell Biol. 2014
Confocal microscopy not only vastly improves the image’s optical resolution but also makes thin “optical sectioning” possible. We now can scan a 3D object layer-by-layer at several focal planes to collect a “z-stack” of successive slices and then process all slices to create a 3D image.
[In this video] Layers of cells in mouse retina were viewed using confocal 3D microscopy.
Based on the principle of confocal microscopy, scientists developed even more advanced super microscopes! For example, two-photon microscopy allows us to see very thick specimens (> mm). Light-sheet fluorescence microscopy can acquire images at speeds 100 to 1000 times faster than traditional confocal microscopes, which is very useful to study living cells.
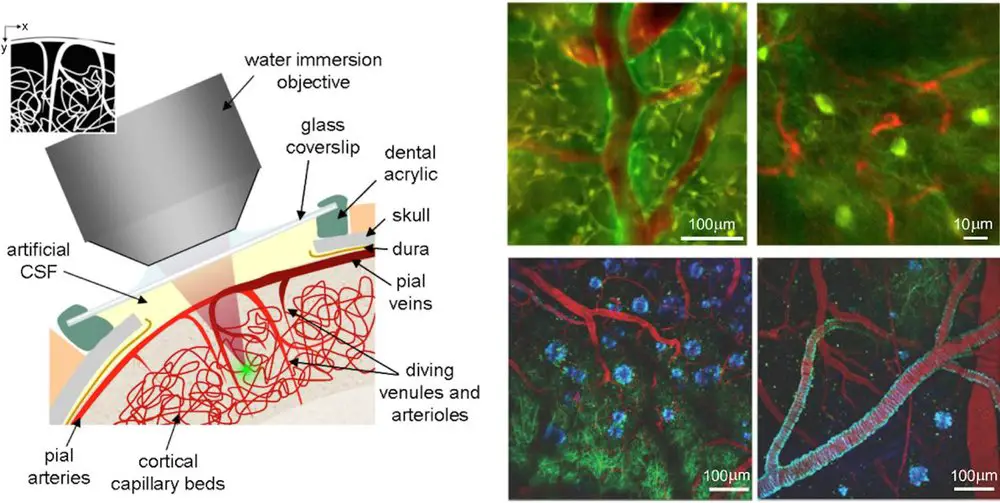
[In this figure] An example of using two-photon microscopy to see blood vessels through the skin (few mm thickness) of a living mouse.
Photo credit: Signal noise magazine
Super-Resolution Microscopy (SRM) goes beyond the diffraction limit of light
The optical resolution of light microscopes is governed by a fundamental set of physical law – the diffraction limit. As a result, the highest achievable point-to-point resolution that can be obtained with an optical microscope is the “half the wavelength of light” used to image the specimen. Two objects which are closer than this distance can’t be distinguished under the microscope.
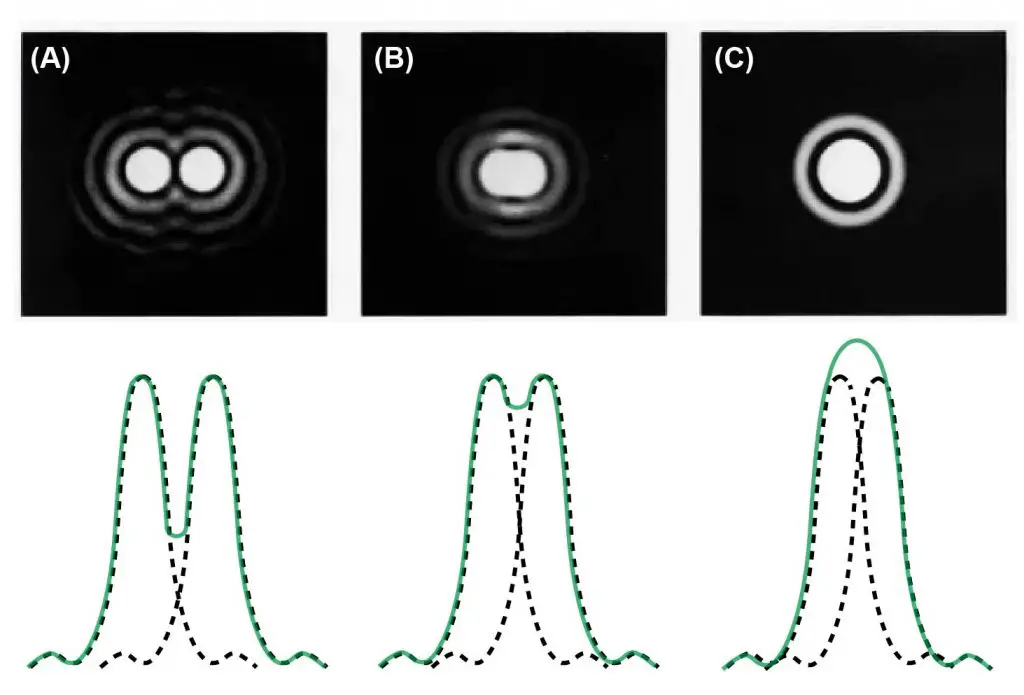
[In this figure] Resolving power.
The ability to distinguish two close objects in the light microscope is restricted by the diffraction limit of the light. Basically, (A) has resolved the light sources pretty well, while (C) cannot distinguish the two light sources. (B) on the other hand, it has intermediate resolving power and will produce a blurred image.
Generally speaking, the shorter the wavelength, the better the resolution. The practical limit (for green light) is ~250nm. Just put things in perspective, the size of a red blood cell is ~8µm, the size of a bacterium is ~1µm. Viruses are usually below 100nm. A single average protein will be ~5nm in size. Therefore, viewing single molecules in cells is a real challenge.
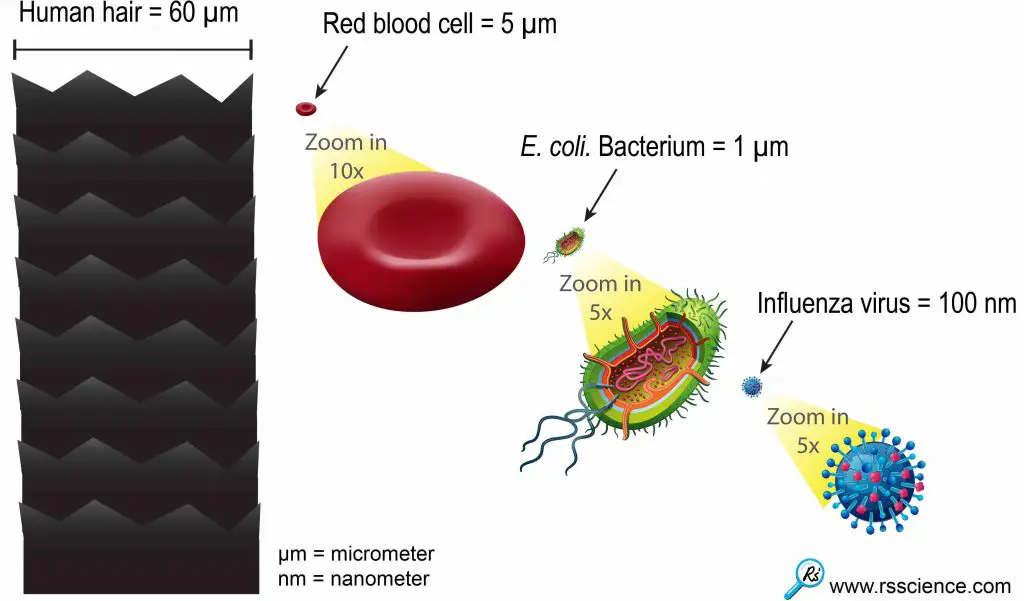
[In this figure] This relative size chart can give you an idea of how small the viruses are.
One influenza or “flu” virus particle is 600 times smaller than the diameter of human hair.
Advances in science and technology, including fast laser, fluorescence labeling, and computing power, made what was formerly thought to be physically impossible now possible. These microscopes, called super-resolution microscopy (SRM), work beyond the diffraction limit. The 2014 Nobel Prize in Chemistry was awarded to 3 of the pioneers in this field (Eric Betzig, Stefan W. Hell, and William E. Moerner).
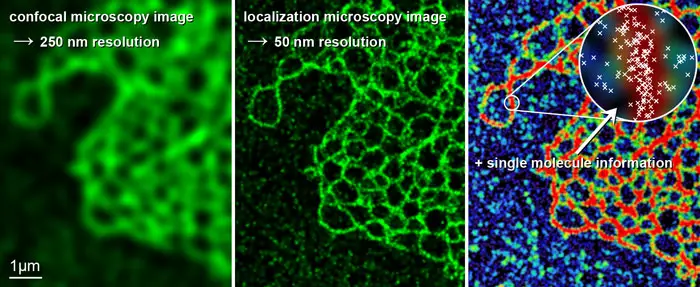
[In this figure] A comparison between images generated by confocal and super-resolution microscopes.
In this example, a super-resolution microscope enables a structural resolution in a biological sample down to the range of 50 nm using light in the visible spectrum (5 times enhancement).
Several types of commercially available light microscopes now can view ultra-fine structures and map macromolecules based on different principles. Examples are Structured Illumination Microscopy (SIM), Stimulated Emission Depletion Microscopy (STED), Stochastic Optical Reconstruction Microscopy (STORM), and Photoactivatable Localization Microscopies (PALM).
If you want to learn more about these fantastic tools, check this website.
Automated cell imaging systems help us to find the cure

With the advancement of computing and robotic technologies, light microscopes were recently integrated with automated systems. These automated imaging systems can view and take images of cells with defined parameters. For example, taking pictures of cells with 10x, 20x, and 40x magnification every 5 minutes for 48 hours.
Usually, these systems include a cell culture chamber that can keep cells growing for days. Cells can grow in small wells, and hundreds of these wells can be monitored simultaneously. Some systems are even equipped with robot hands that can add different chemicals into individual wells. Cells treated with different chemicals will be checked by an imaging system to find out the effect of particular chemicals. Many pharmaceutical companies are finding new drugs using this kind of “high throughput screening” system. Some even use artificial intelligence (AI) to diagnose minor changes in cells that humans can’t tell.
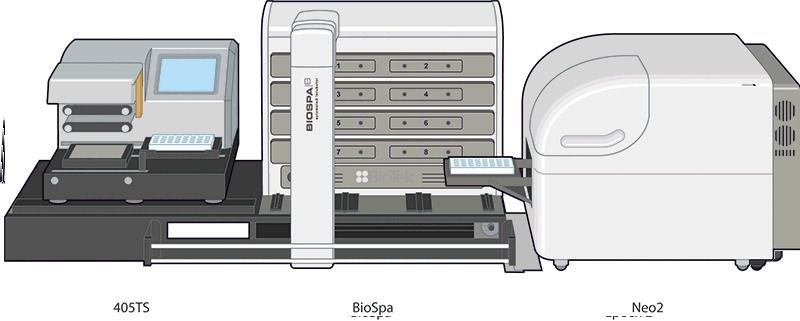
[In this figure] An example of an automated cell imaging system integrated with a camera, cell culture, and robots.
Photo credit: BioTek.
Electron microscopes (EM) see things in a different way
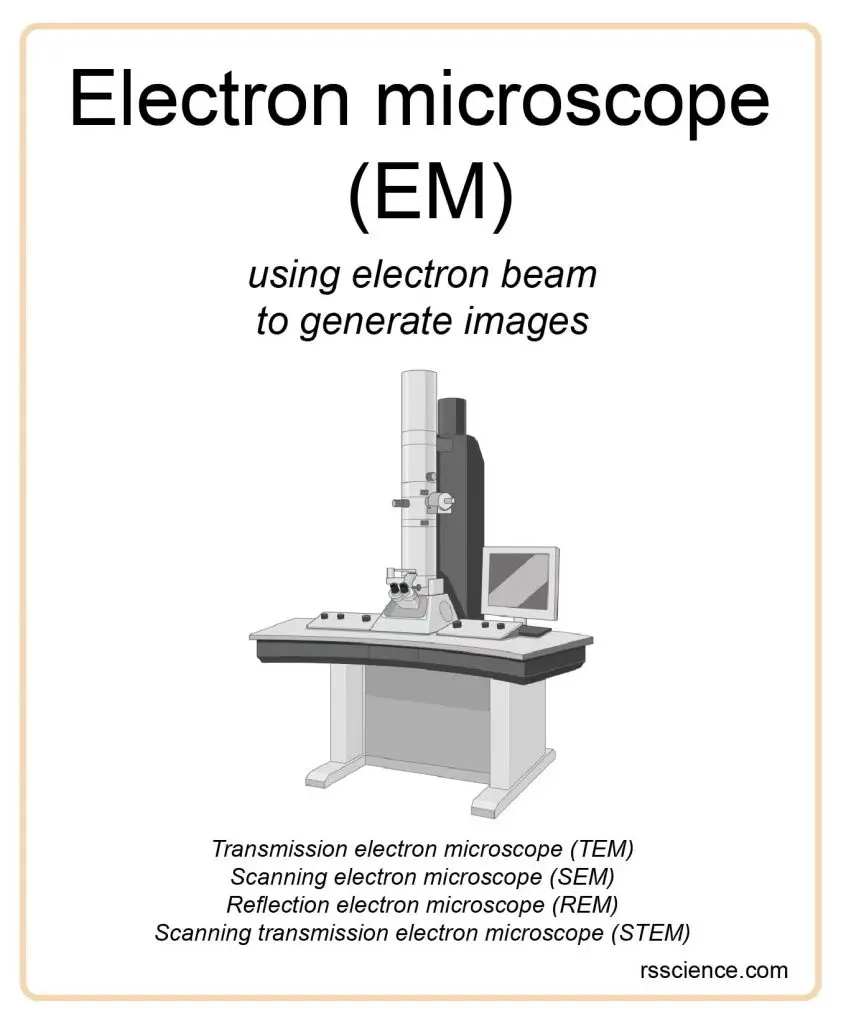
In addition to the light microscope, scientists also developed microscopes to generate images by other means. As we mentioned before, the resolving power of an optical microscope is limited by the nature of light. To see smaller things, the scientists have to find an illumination with a wavelength much shorter than the visible light. In the early 1930s, they realized that electrons could do so and thus developed the electron microscope (EM).
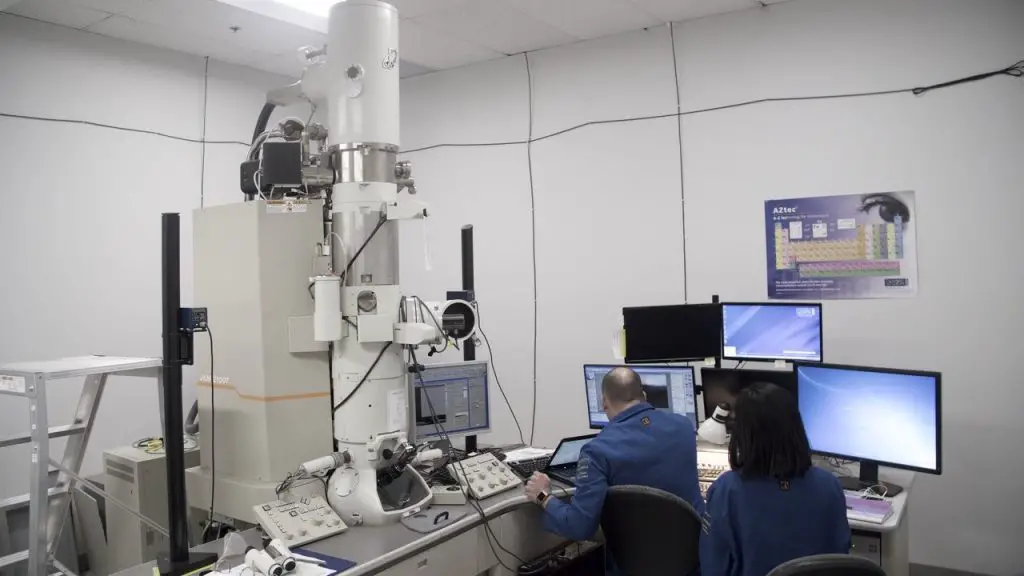
[In this figure] A transmission electron microscope in a dedicated research center.
Photo credit: Alexander Fisher-Wagner/UC Davis.
Electron microscopes generate images by sending accelerated electron beams on specimens. According to modern physics, an electron has both properties as a particle and a wave. Thus, an electron has a wavelength (called De Broglie wavelength) depending on its energy (or speed). For example, if an electron is speeded up in a vacuum tube to the speed of 1,000,000 meters per second (equal to 2.2 million miles per hour!), the De Broglie wavelength we get is around one-tenth of a nanometer, which is about the size of an atom. This is why we can use electron microscopes to “see” much smaller structures than light microscopes.
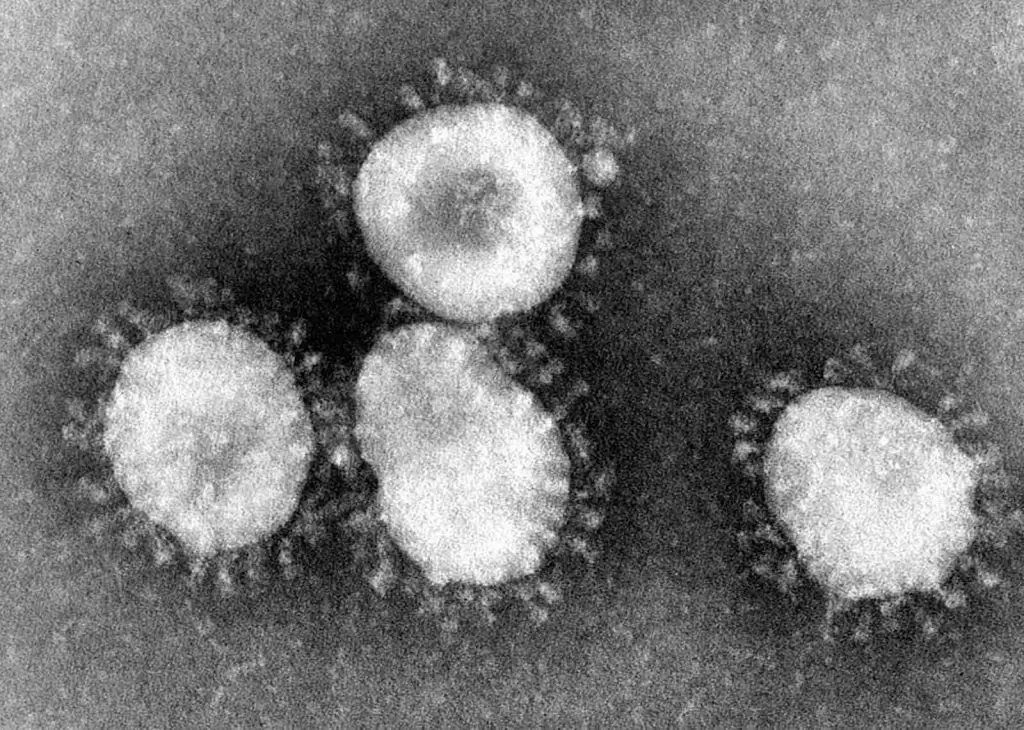
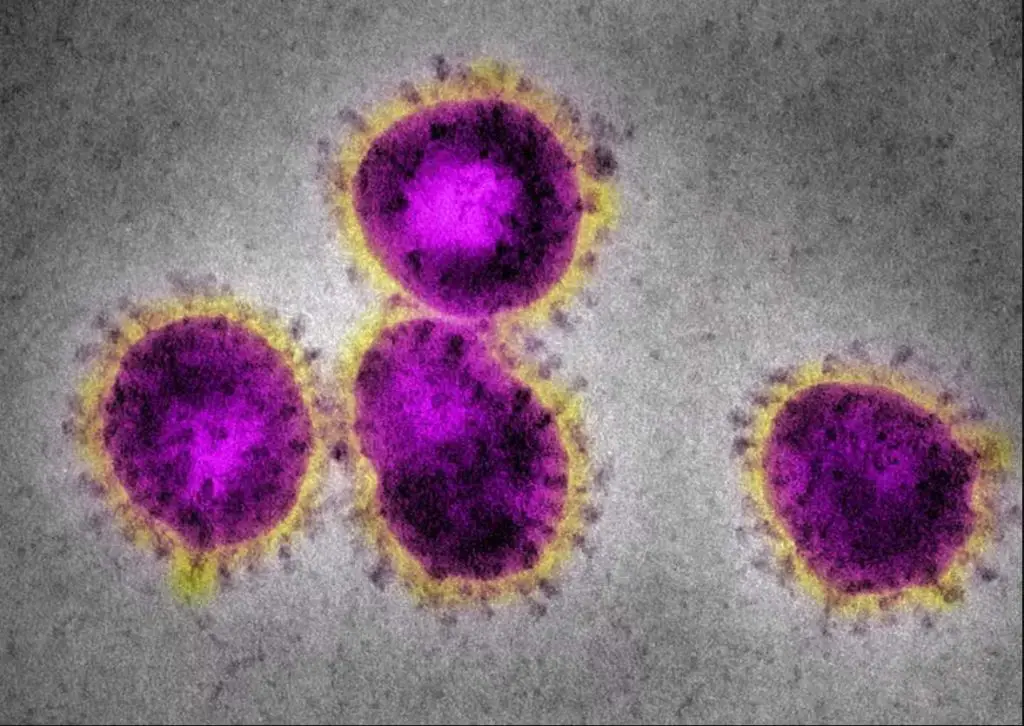
[In this figure] Electron microscopes can see super tiny things like viruses.
The EM image of coronaviruses shows a halo or crown-like (corona) appearance. Original electron microscopic images are always black-and-white. The colors are artificially painted for better visualization (right).
Photo credit: CDC.
Scanning Electron Microscopes see the texture
SEM stands for Scanning Electron Microscope. An SEM is a type of electron microscope that uses a fine beam of focused electrons to scan a sample’s surface. SEM images give insight into a sample’s surface topography; therefore, it creates 3-D images.
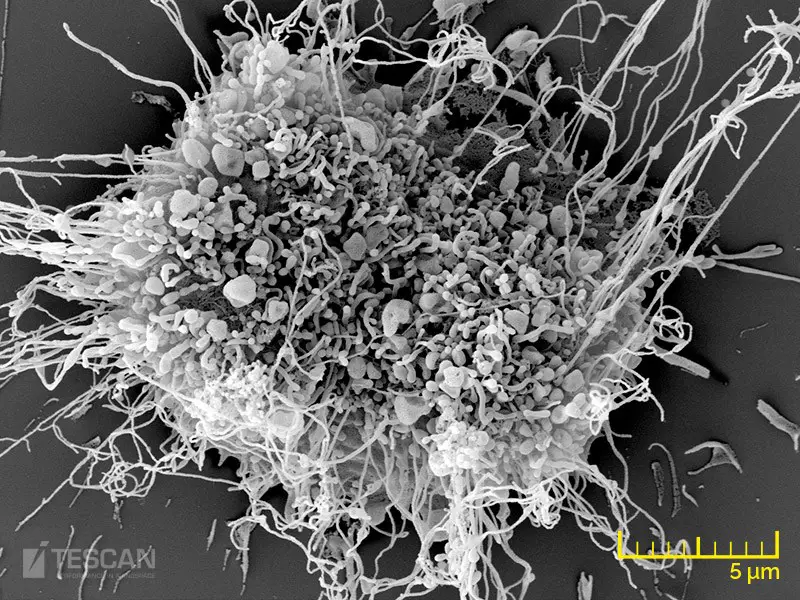
[In this figure] SEM image of a fibroblast.
A fibroblast is a type of cell that synthesizes the extracellular matrix and collagen for connective tissues. SEM images allowed us to see all kinds of cellular protrusions and extracellular matrix on the surface of the cell.
Photo credit: tescan.com
Transmission Electron Microscopes see sections
TEM stands for Transmission Electron Microscope. A TEM is a type of electron microscope that uses a broad beam of electrons to create an image of the internal structure of the sample. A beam of electrons is transmitted through a sample to create an image. Samples must be incredibly thin, often less than 150 nm thick, to allow electrons to pass through them. Therefore, TEM creates 2-D images. Below is an example of a TEM image.
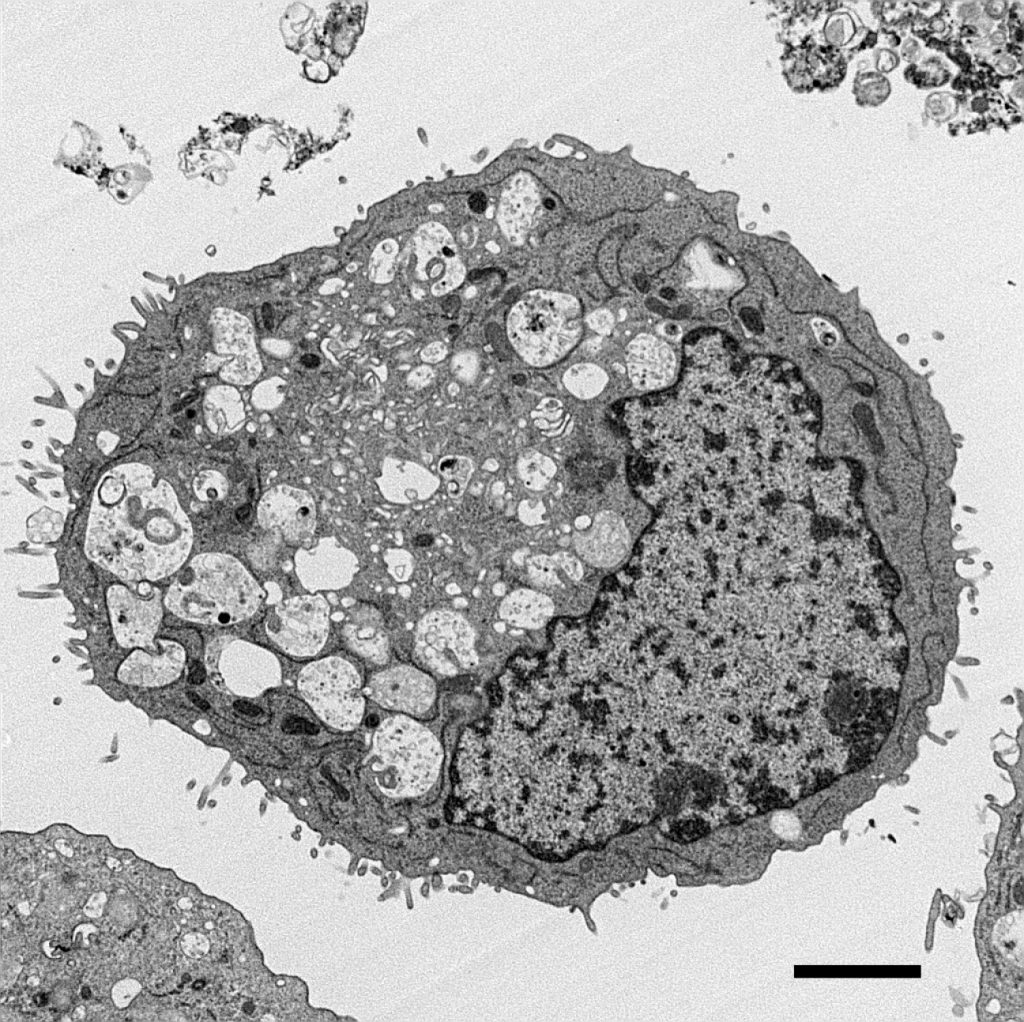
[In this figure] TEM image of pancreatic ductal adenocarcinoma (PDAC) cancer cell.
PDAC is one of the deadliest cancers in Western countries. Scientists learned from this TEM image that abnormal mitochondria contribute to the growth of cancer cells. (Credit: High-Resolution Electron Microscopy Facility at MD Anderson Cancer Center)
Check the link to know more about electron microscope and images.
Scanning probe microscopes see the microworld by scratching the surface
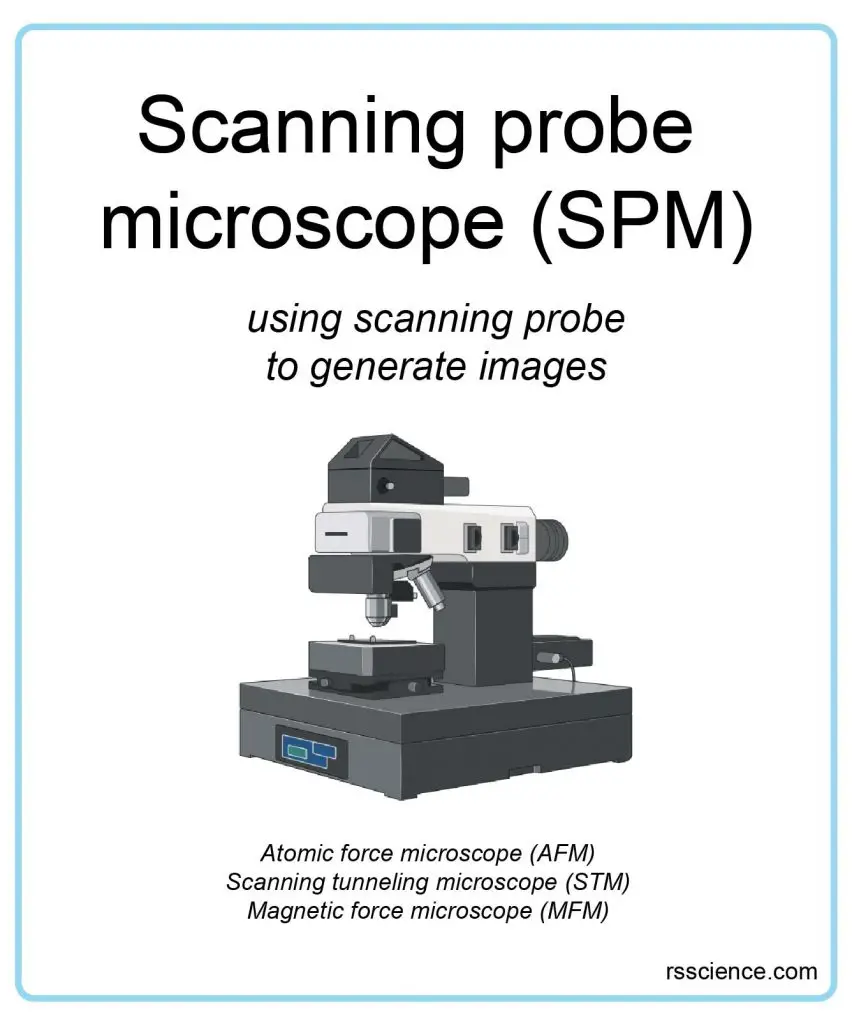
Another group of microscopes, collectively called Scanning probe microscopes (SPM), use very tiny probes to scan the surface of objects to generate images. You can imagine that you use your finger to feel the texture of cotton cloth, but at an atomic scale. In fact, these scanning probe microscopes like Atomic force microscopy (AFM) can detect the surface up and down (topology) at single-atom resolution. The probe can even move and arrange a single atom.
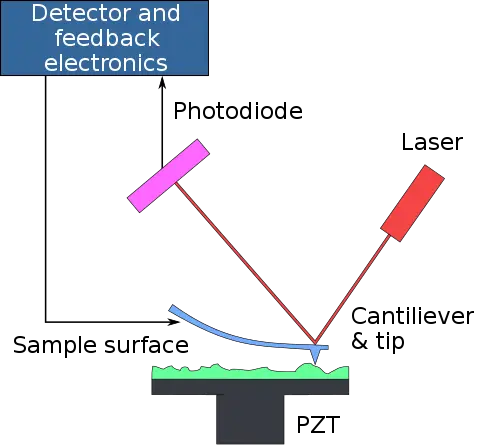
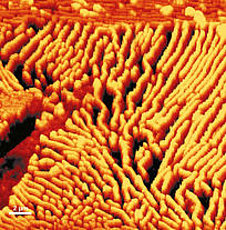
[In this figure] Atomic force microscopy (AFM) delivers precise information on surface topology.
AFM uses a very tiny probe on a cantilever to scan the surface of an object. The interaction between the probe tip and atoms on the surface generates a tiny force on the cantilever, which can be detected by a laser. By moving the probe slowly, the force detected at each point can generate a map of the three-dimensional shape (topography) of a sample surface at a super high resolution.
Photo credit: Piezo technology.
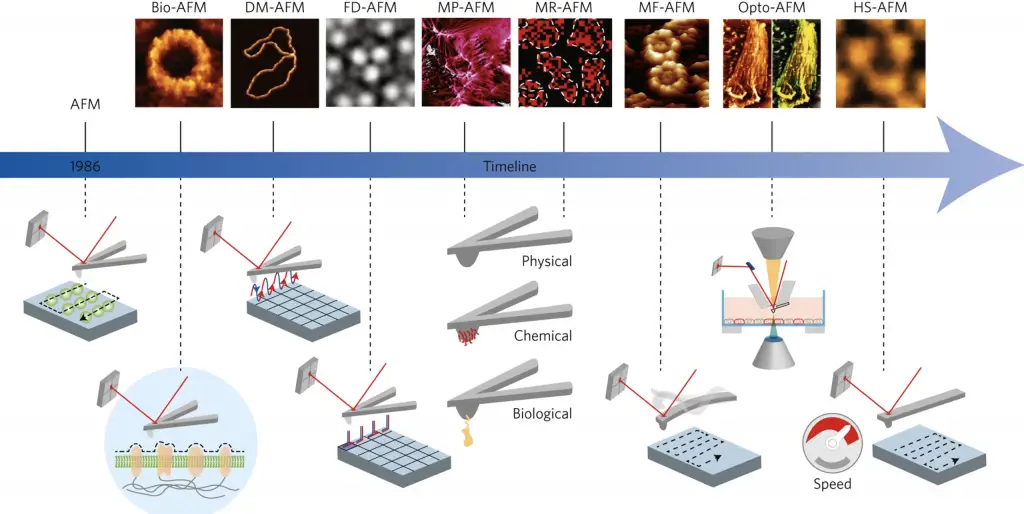
[In this figure] The power of scanning probes microscopes. The family of SPMs is growing. By using different probes, scientists can detect very weak interactions (for example, antibody-antigen) between the probes’ tips and the specimen at an atomic scale.
Image credit: Nature nanotechnology.
[In this video] A boy and his atom: The world’s smallest movie.
This movie was generated by IBM researchers using a scanning tunneling microscope (STM) to move thousands of carbon monoxide molecules one-by-one.
Summary
Microscopes are amazing tools if you want to explore the microscopic wonderland. In this article, we learned:
- Depended on the principle of generating images, microscopes can be classified into three types: light (optical), electron, and scanning probe microscopes.
- Light microscopes have a history of more than 500 years. Different light microscopes form a vast family tree, and they are still developing.
- Compound microscopes have more than one lens to generate high magnification images of flat, thin specimens.
- Stereo microscopes are ideal for seeing the surface textures of 3D objects.
- Fluorescence microscopes can see a specific spectrum of fluorescent lights. Scientists use fluorescence microscopes and antibodies to study invisible molecules inside the cells.
- Many cool techniques can solve the limitation of traditional light microscopes. A confocal microscope is a good example that can remove unwanted off-focus blur and see the cellular structures in 3D.
- New microscope systems are integrated with computers and robots to perform the drug discovery automatically 24 hours a day, 7 days a week.
- The diffraction limit of light restricts traditional light microscopes.
- Super-resolution microscopy is an active and exciting field of research that can allow us to see tiny things beyond the diffraction limit.
- Another way to see smaller things is by using the electron bean instead of visible light. These types of electron microscopes (EM) can be divided into SEM and TEM.
- Scanning probe microscopy uses a very tiny probe to detect the surface topology at a single atom scale.
Reference
“Historical perspective of optical microscopy” by ZEISS
“Anatomy of the Microscope: Introduction” by Olympus