
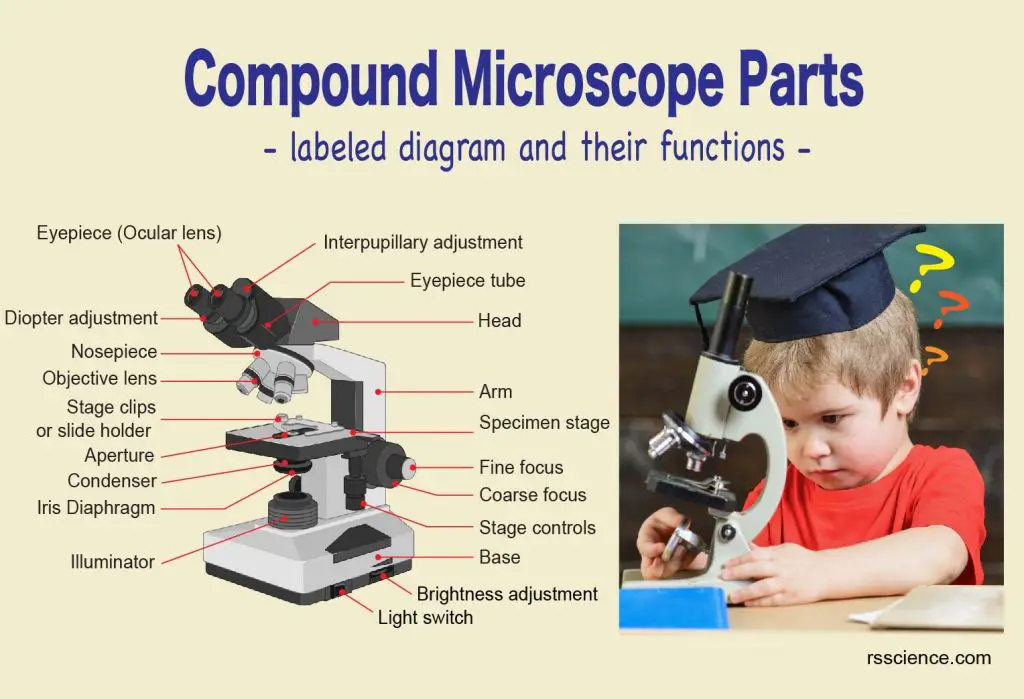
This article will review the structure of a compound microscope and explain to you how each part works to give us the magnification images.
This article covers
An overview of microscopes
What is a microscope? A microscope is an instrument used to see objects that are too small to be seen by the naked eye.
We have an article covering the history, types, and evolution of all kinds of microscopes. If you are interested in this topic, please click the link above.
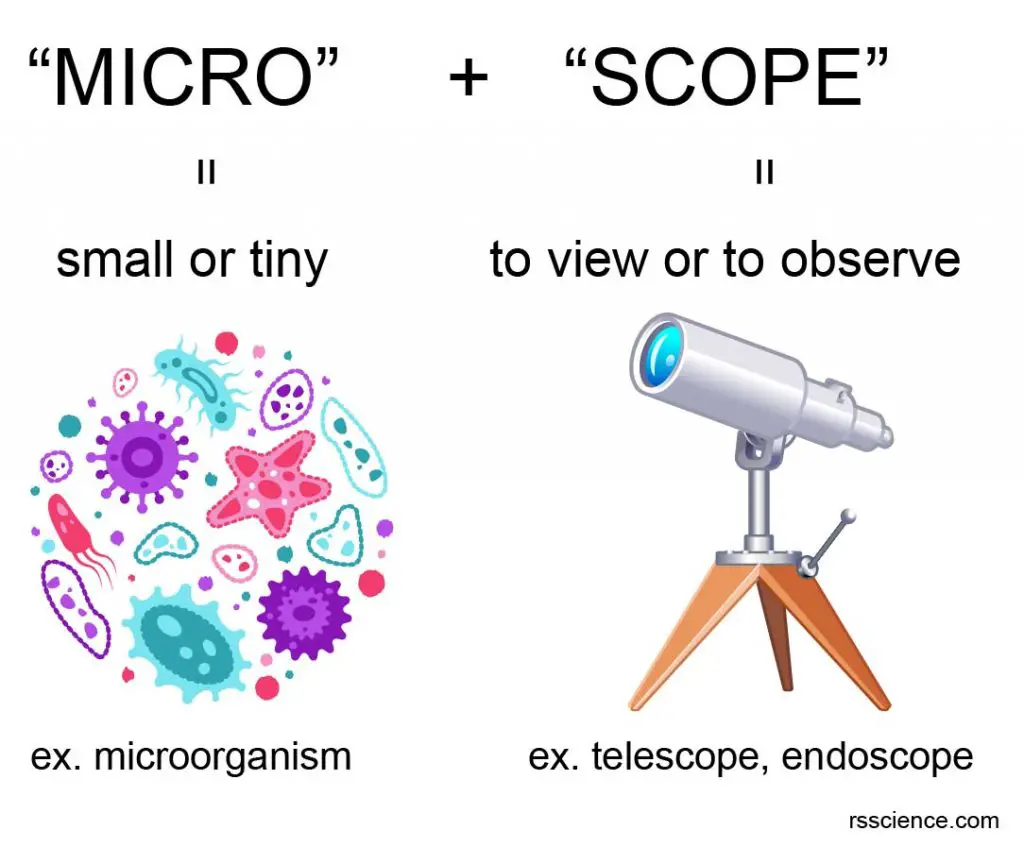
[In this figure] The name “microscope” came from two words – “micro” and “scope”.
“Micro” means small or tiny. “Scope” means to view or to observe. Therefore, a microscope can be understood as an instrument to see tiny things.
What is a “compound microscope”?
A compound microscope is the most common type of light (optical) microscopes. The term “compound” refers to the microscope having more than one lens. Basically, compound microscopes generate magnified images through an aligned pair of the objective lens and the ocular lens. In contrast, “simple microscopes” have only one convex lens and function more like glass magnifiers.
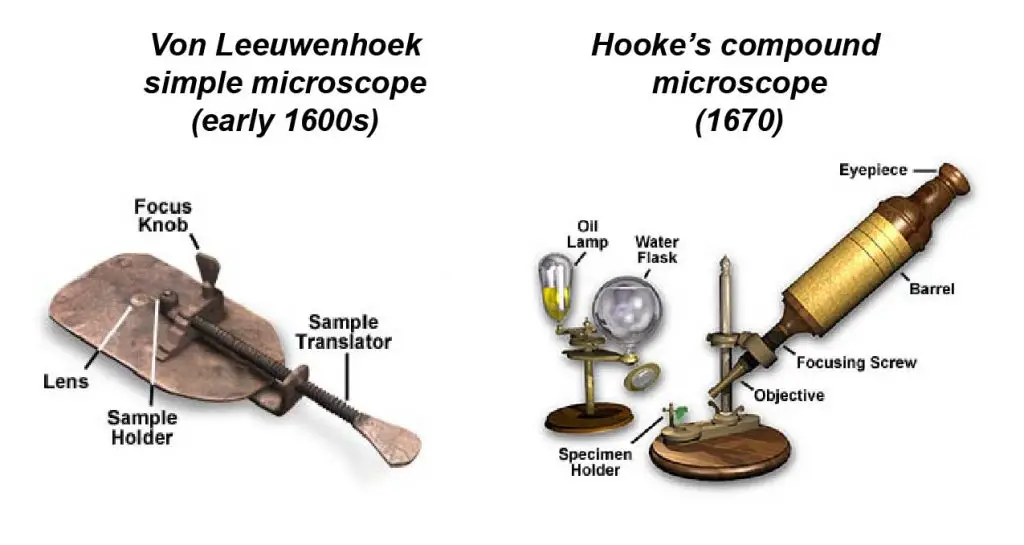
[In this figure] Two “antique” microscopes played significant roles in the history of biology.
Left: Anton von Leeuwenhoek’s microscope was a simple glass magnifier with only one convex lens. He discovered many microorganisms, such as Paramecium, using this simple microscope. Right: Robert Hooke observed “cells” using his modified compound microscope. He established the cell theory, which states that all organisms are made of cells, all life functions occur in cells, and all cells come from other cells.
Photo credit: Olympus.
Labeled diagram of a compound microscope
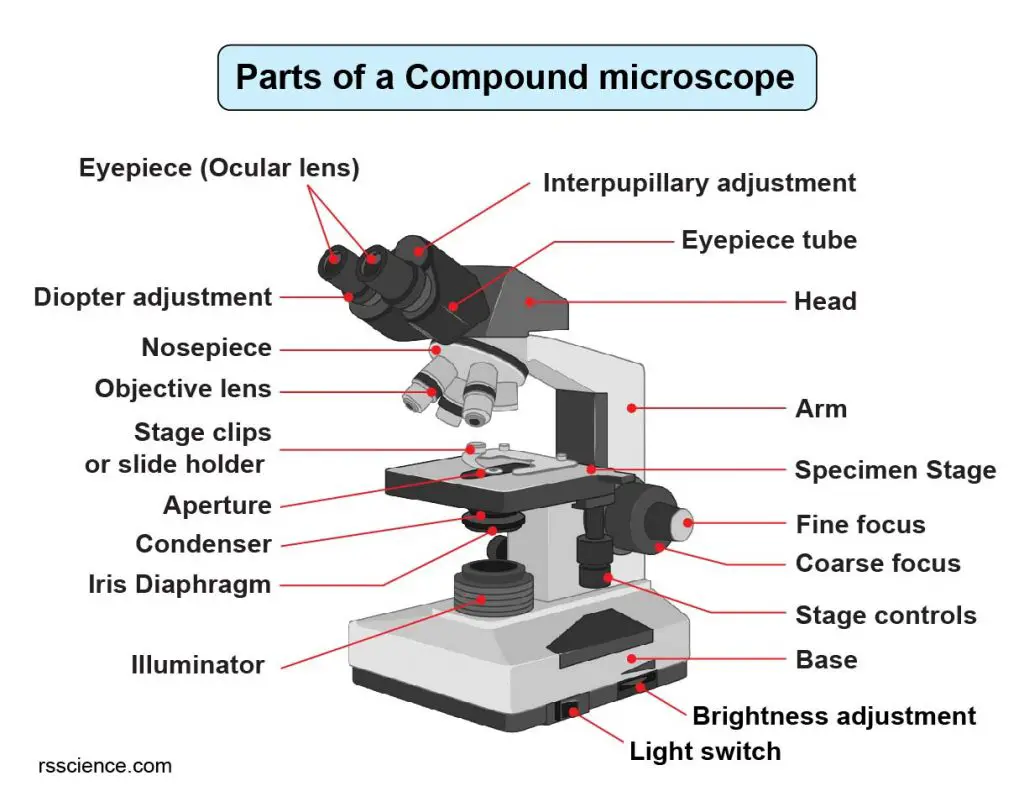
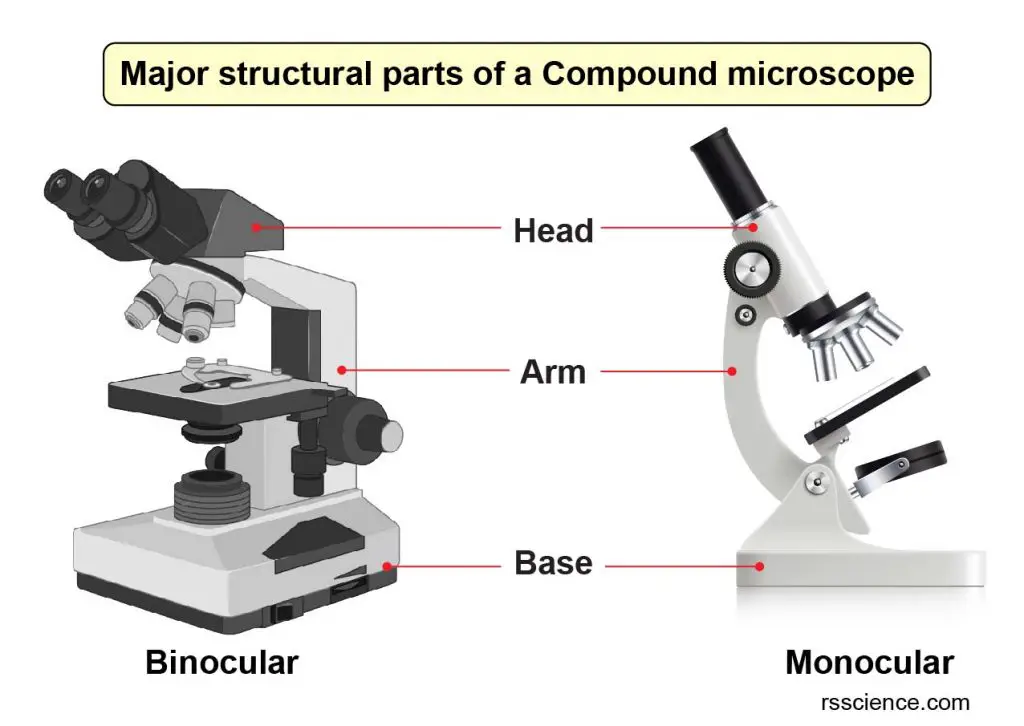
Major structural parts of a compound microscope
There are three major structural parts of a compound microscope.
- The head includes the upper part of the microscope, which houses the most critical optical components, and the eyepiece tube of the microscope.
- The base acts as the foundation of microscopes and houses the illuminator.
- The arm connects between the base and the head parts.
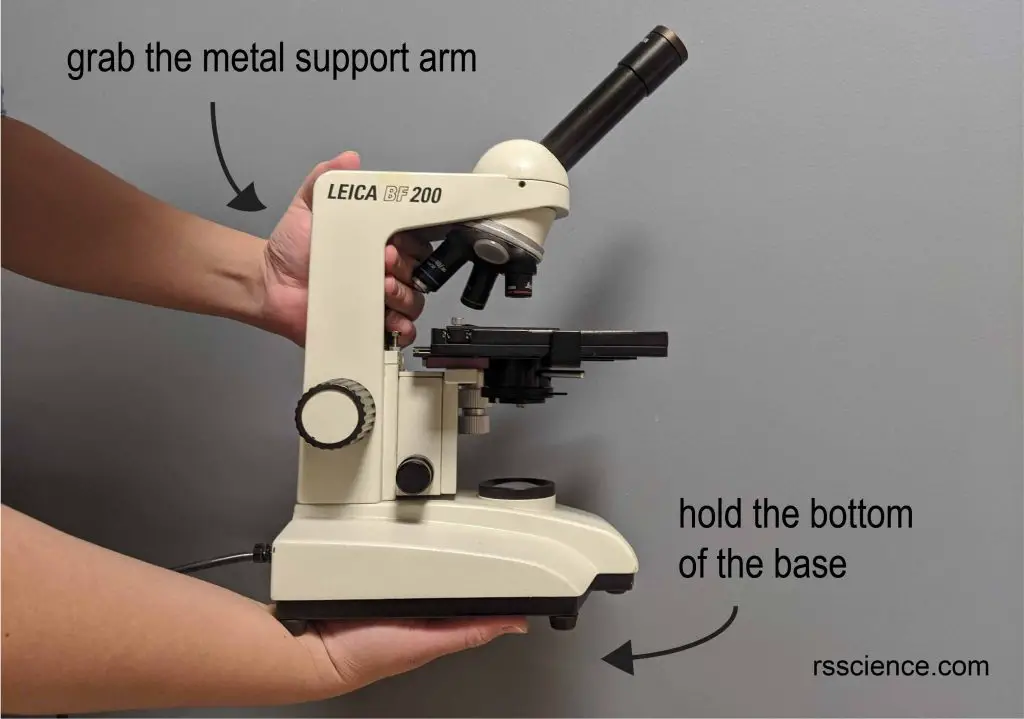
Note: When carrying a compound microscope, please always lift it by holding both the arm and base simultaneously, like the image below.
Optical components of a compound microscope
Many optical parts of a microscope work together to magnify and produce an image of the specimen placed on a slide. These parts include:
Eyepiece
The eyepiece (or ocular lens) is the lens part at the top of a microscope that the viewer looks through. The standard eyepiece has a magnification of 10x. You may exchange with an optional eyepiece ranging from 5x – 30x.
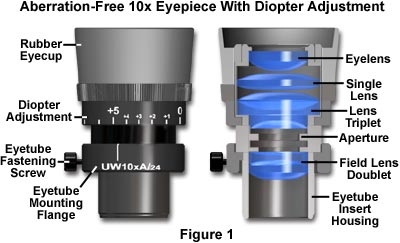
[In this figure] The structure inside an eyepiece.
The current design of the eyepiece is no longer a single convex lens. Instead, the eyepiece consists of several optical lenses working together to give us the best imaging.
Photo credit: Molecular expressions.
Eyepiece tube
The eyepiece tube carries the eyepiece lens. It holds the eyepiece in the right place that aligns perfectly with the objective lenses. It also places the eyepiece and the objective lenses within a distance range, generating in-focus images.
For monocular microscopes, there is only one eyepiece tube. Binocular microscopes have two eyepieces that allow you to see with both your eyes. The eyepiece tube is flexible and can be rotated/adjusted to fit the users’ distance between two eyes (interpupillary adjustment). A trinocular microscope has an additional third eyepiece tube for connecting a microscope camera.
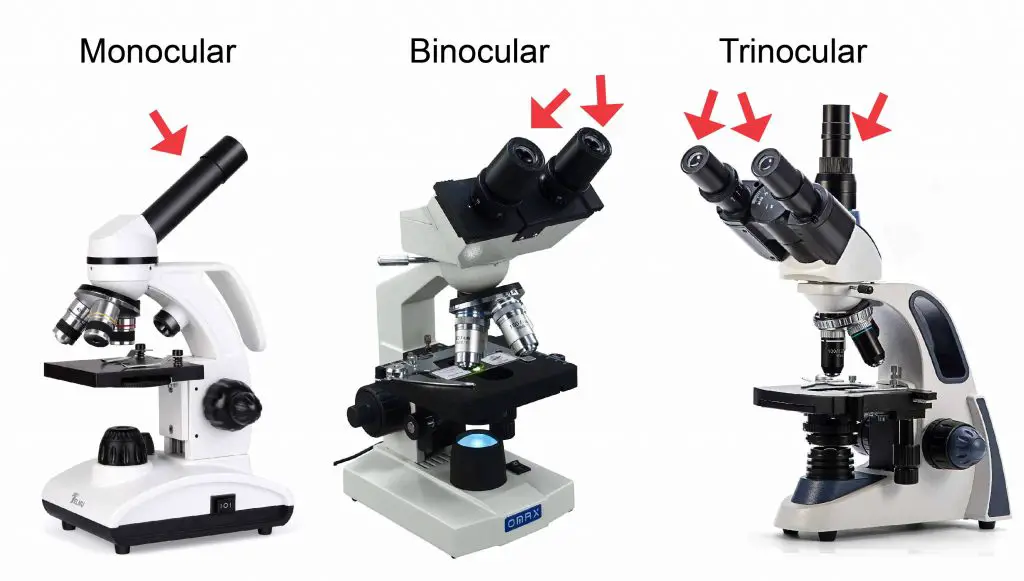
[In this figure] Examples of Monocular, Binocular, and Trinocular compound microscopes.
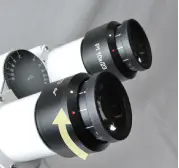
[In this figure] Diopter adjustment.
The eyepieces of binocular microscopes typically have a diopter adjustment ring that allows for correcting the difference in vision between your two eyes. By adjusting it, both eyes can see a clear image.
Photo credit: Spot imaging.
Objective lenses
Objective lenses are the primary optical lenses for specimen visualization on a microscope. Objective lenses collect the light passing through the specimen and focus the light beam to form a magnified image. The objective lenses are the most important parts of a microscope.
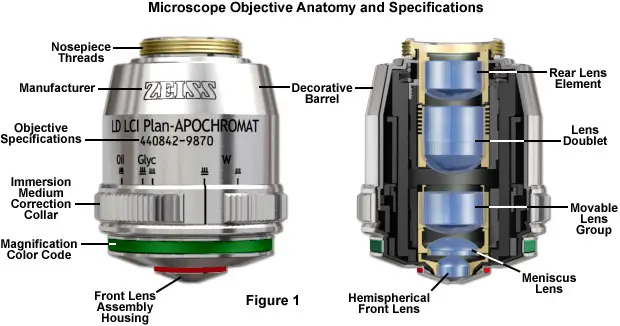
[In this figure] The structure of objective lenses.
The most important imaging component in the optical microscope is the objective. The current objective is a complex multi-lens assembly that has great power to focus light waves.
Photo credit: Zeiss.

[In this figure] A collection of objective lenses.
Each objective has its information (i.e. magnification) and color-code label on the side.
Photo credit: Accu-scope.
Usually, a compound microscope comes with 3 or 4 objective lenses. The most common setting is:
Scanning objective lens (4x)
A scanning objective lens provides the lowest magnification power of all objective lenses. The name “scanning” objective lens comes from the fact that they provide observers with enough magnification for a wide overview of the slide, essentially a “scan” of the slide.
Low power objective lens (10x)
The low-power objective lens has more magnification power than the scanning objective lens, and it is one of the most helpful lenses for general viewing purposes.
High power objective lens (40x)
The high-powered objective lens (also known as the “high dry” lens) is ideal for observing fine details within a specimen sample.
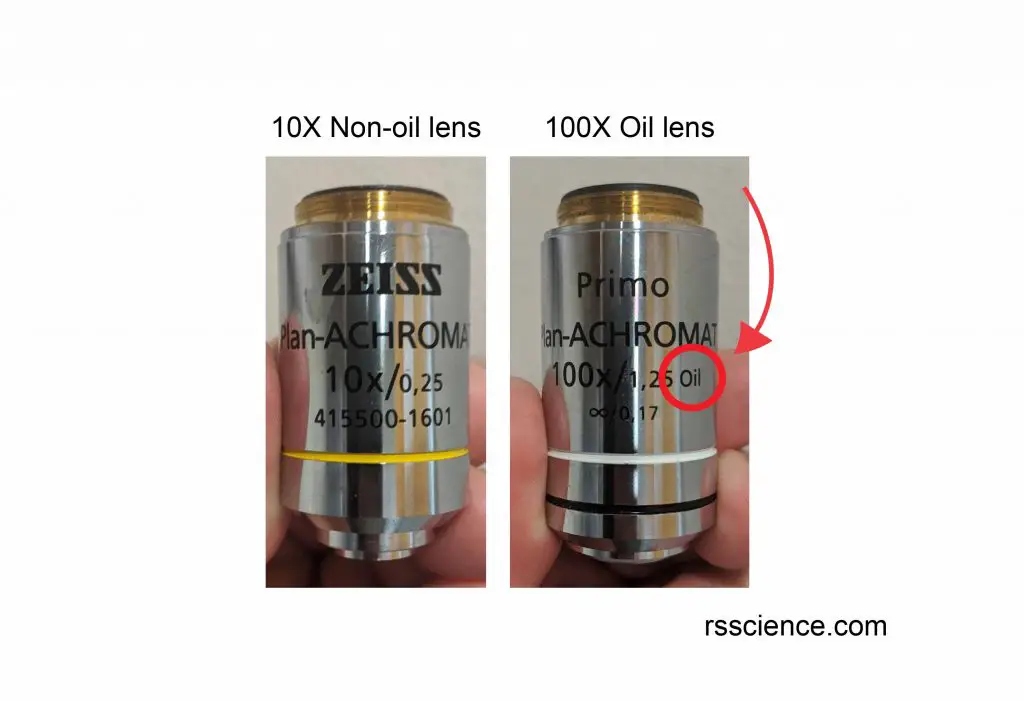
Oil immersion objective lens (100x)
The oil immersion objective lens provides the most powerful magnification. However, the refractive index of air and your glass slide are slightly different, so a special immersion oil must be added to bridge the gap. Without immersion oil, the 100x lens will not function correctly. The specimen appears blurry, and you will not achieve an ideal magnification or resolution.
Check our posts to learn more about immersion oil.
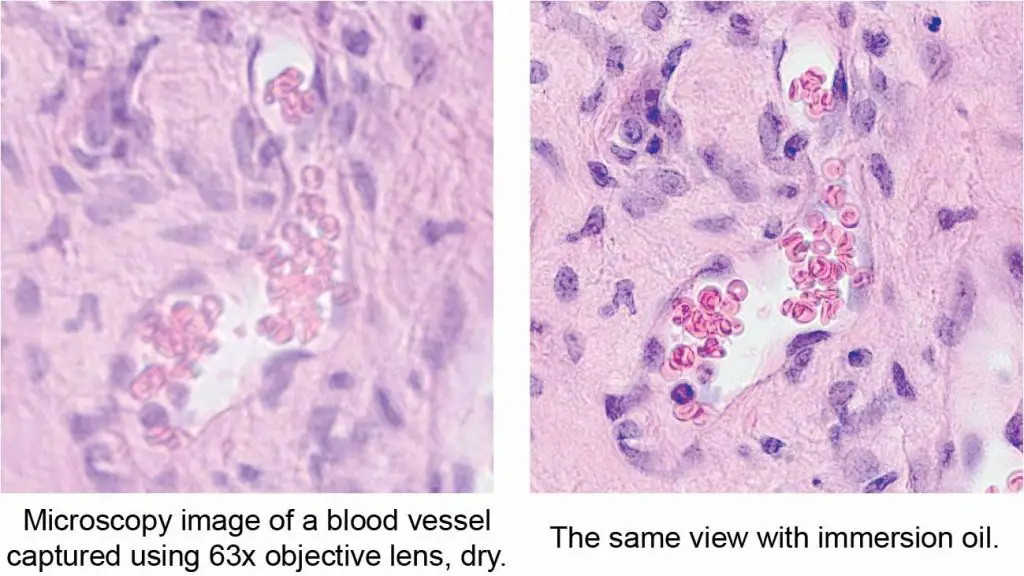
[In this figure] The “before” and “after” using immersion oil.
The left image was dry (no oil) and the right image was with microscope immersion oil. Notice the difference in image quality and the resolution between the image captured dry versus with immersion oil.
Objective lenses with higher magnification are usually longer. As a result, the tip of high magnification objective lenses (100x) is very close to the specimen. Please be very careful when viewing and handling high magnification objective lenses. Check our post for more tips to take care of your microscope.
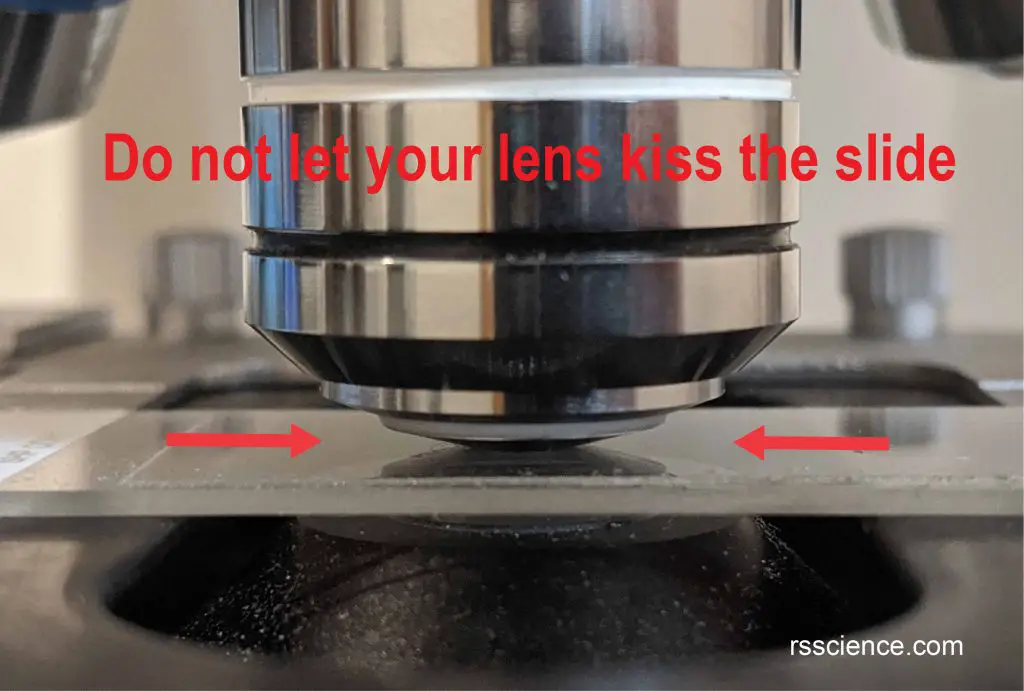
Some high-quality, higher power objectives (starting from 40x) are spring-loaded. Spring-loaded objective lenses will retract if the objective lens hits a slide, preventing damage to both the lens and the slide.
How to calculate the magnification power?
To obtain the total magnification power, multiply the magnification of the eyepiece and objective lens used:
For example:
[10x eyepiece] x [40x objective] = 400x total magnification

[In this figure] The same specimen field of view from low to high magnifications.
At low magnifications (5x and 10x), you can have the overall view of the entire specimen – Vicia (pea family) root tip. By getting closer (with higher magnification), you will start to notice the cells and their nuclei (blue dots). At high magnifications (63x and 100x with lens immersion oil), you can see some nuclei looked different from others. These spindle-shaped nuclei are dividing (or under mitosis) and their chromosomes (bundles of DNA) are moving apart.
What does the number on the objective lens mean?
The information about an objective lens is labeled on its side. Key information that you should pay attention to is the magnification (i.e., 100x), NA (i.e., 1.25), and required media (i.e., Oil; no label means air). High-end microscopes also have achromatic, parcentered, or parfocal lenses. Lenses are color-coded and are interchangeable between microscopes if built to DIN standards.
Numerical Aperture (NA) determines the limit of the Resolution that your microscope can achieve. The value of NA ranges from 0.025 for very low magnification objectives (1x to 4x) to as much as 1.6 for high-performance objectives utilizing specialized immersion oils. The higher the NA, the better the Resolution is.
Nosepiece
Nosepiece is also known as the revolving turret. Nosepiece is a circular structure housing the objective lenses. There are holes where the different objective lenses are screwed in.
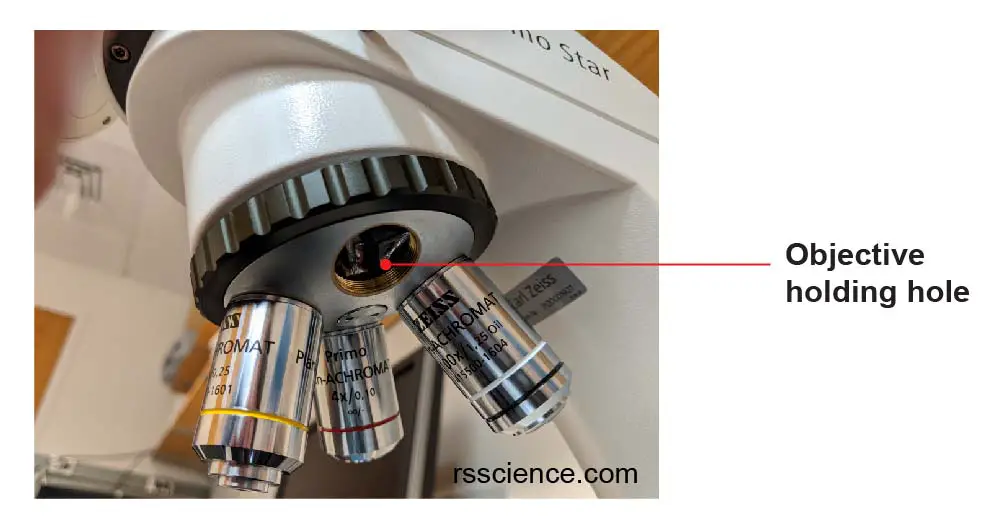
[In this figure] To install an objective lens, twist the objective left to find the threading and then begin twisting the objective just like a screw into the hole.
To change the magnification power, simply rotate the turret to select different objectives. An audible click identifies the correct position for each lens as it swings into place. When turning the nosepiece, grasped the ring around its edge, not the objectives. Using the objectives as handles can de-center and possibly damage them. Pay special attention to the distance between objectives and slides when you switch from low to high power lenses.
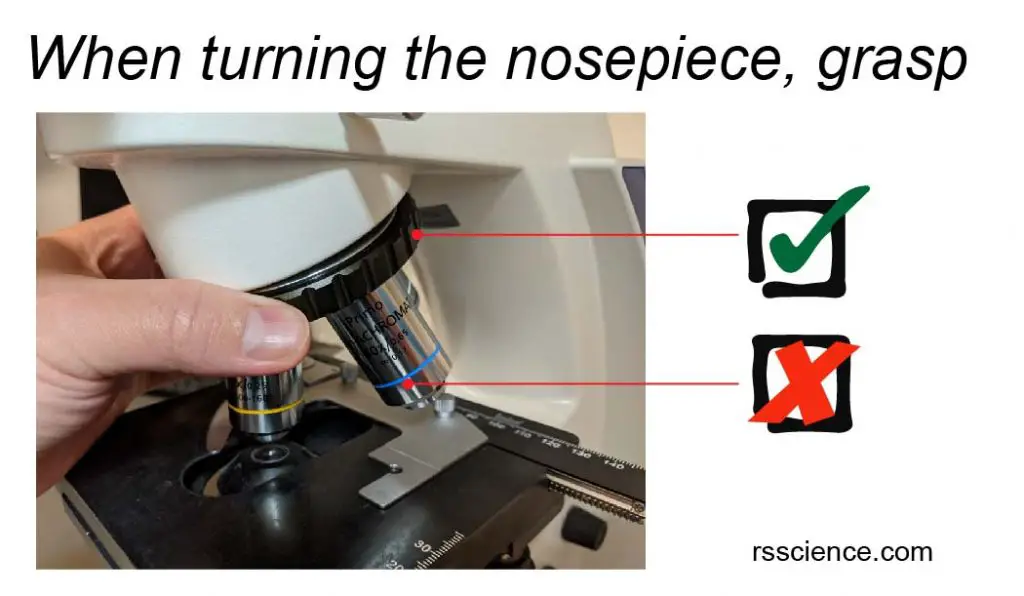
[In this figure] Always grasp the ring of the nosepiece, not the objectives, to switch the objective lenses.
Specimen stage
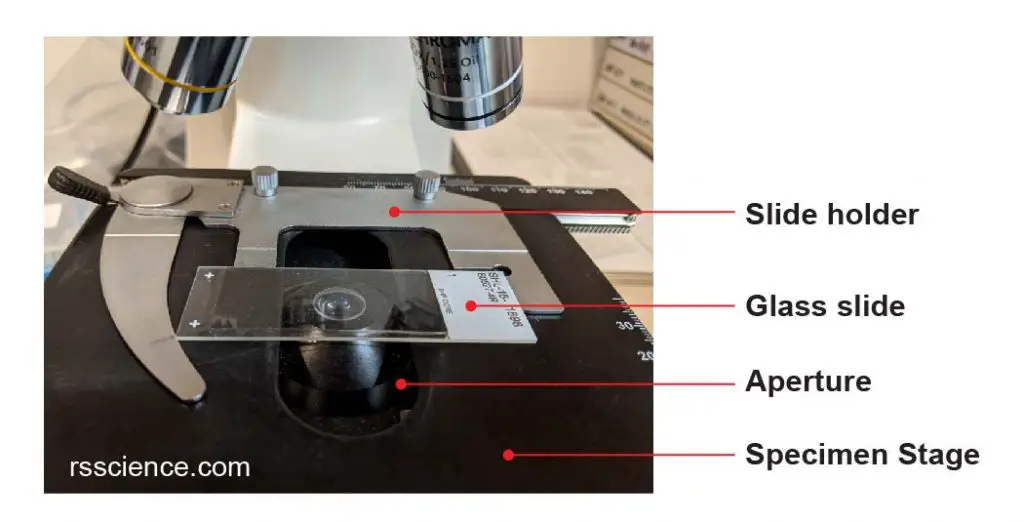
The stage is a flat platform that supports the slides. The stage has an opening (called aperture) for the illuminating beam of light to pass through. The stage clips hold the slides in place.
If your microscope has a mechanical stage, the slide secured on the slide holder can be moved in two perpendiculars (X – Y) directions by turning two knobs. One knob moves the slide left and right; the other moves it forward and backward. The mechanical stage provides more stable movements of the specimen slide instead of having to move it manually.
[In this figure] A closer view of a mechanical stage.
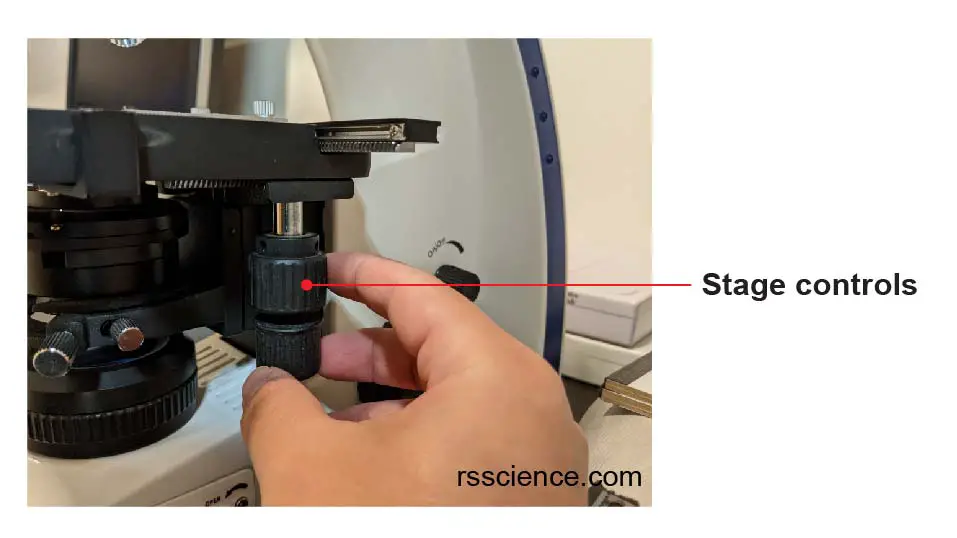
[In this figure] Use the stage controls to position your slide in two perpendiculars (X – Y) directions.
Coarse and fine focus knobs
Two adjustment knobs are used to focus the microscope: fine focus knob and coarse focus knob. Both knobs can move the stage up and down. You should use the coarse focus knob to bring the specimen into approximate or near focus. Then you use the fine focus knob to sharpen the focus quality of the image. When viewing with a high-power objective lens, carefully focus by only using the fine knob.
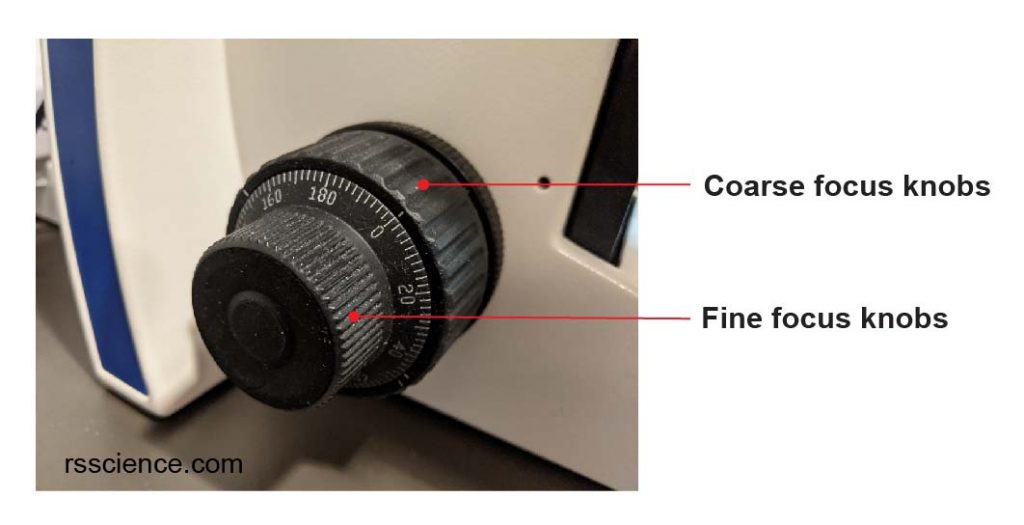
[In this figure] A pair of coarse and fine focus knobs.
These two focus knobs are coaxial, meaning they are built on the same axis with the fine focus knob on the outside. Coaxial focus knobs are more convenient since the viewer does not have to grope for a different knob.
Rack stop
Rack stop is a safety feature to prevent the slide from coming too far up and hitting the objective lens.
Illuminator
The illuminator is the light source for a microscope, typically located in the base of the microscope. Halogen bulbs are commonly used to provide a steady light source. Currently, LED lights become more and more popular.
Mirrors are sometimes used instead of a built-in light. Mirrors are used to reflect light from an external light source up through the bottom of the stage.
Condenser
Condensers are lenses that are used to collect and focus light from the illuminator into the specimen. Condensers can be found under the stage often in conjunction with an iris diaphragm.
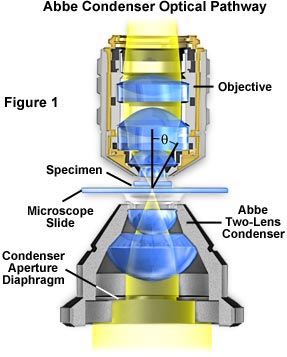
[In this figure] A condenser gathers light from the light source and concentrates it into a cone of light that illuminates the specimen with uniform intensity over the entire field of view.
Condensers are critical to obtaining sharp images at magnifications of 400x and above. The higher the magnification of the condenser, the more the image clarity. For a 40x objective lens, a stage mounted 0.65 N.A., or greater condenser is ideal. If your microscope goes to 1000x or above, a focusable condenser lens with an N.A. of 1.25 or greater is needed for greater clarity.
Abbe condenser
Most sophisticated microscopes that go up to 1000x come equipped with an Abbe condenser, which can be focused by moving it up and down. The Abbe condenser should be set closest to the slide at 1000x and moved further away as the magnification level gets lower.
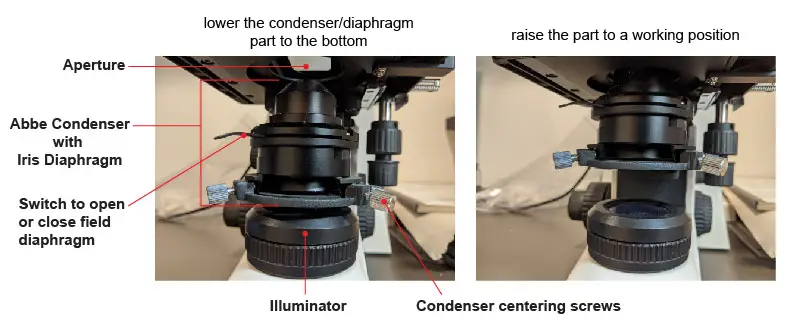
[In this figure] Left: The Abbe condenser and Iris diaphragm are usually integrated together and placed under the stage. Right: The condenser/diaphragm part is moved up by turning the condenser focus knob to a working position.
Iris Diaphragm
Iris Diaphragm is located below the condenser and above the light source. This apparatus can be adjusted to vary the intensity and size of the cone of light projected through the slide.
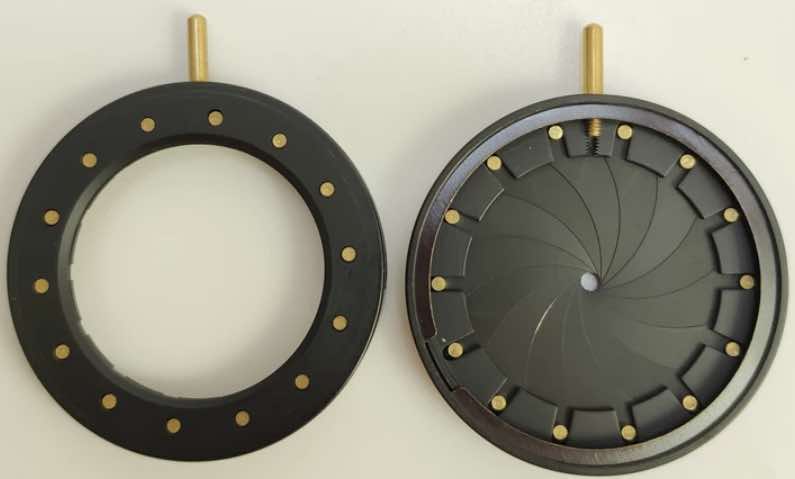
[In this figure] Structure of Iris Diaphragm.
Abbe condenser and Iris Diaphragm are essential for high-quality microscopes. Combined, they control both the focus and quantity of light applied to the specimen, respectively. The setting of the Iris Diaphragm and Abbe condenser depends on the transparency of the specimen and the degree of contrast you desire in your image.
These parts are essential to set a Köhler Illumination, which provides even illumination of the specimen.
Condenser Focus Knob
This knob moves the condenser up or down to control the lighting focus on the specimen.
If you are in the market of buying a compound microscope, please check “best digital microscope“
Summary
In this article, we reviewed the parts of a compound microscope and their functions. Here are some key points:
- Compound microscopes have more than one lens to generate high magnification images of flat, thin specimens.
- There are three major structural parts of a microscope: Head, Base, and Arm.
- Always lift a microscope by holding both the arm and base with two hands.
- There are two major optical lens parts of a microscope: Eyepiece (10x) and Objective lenses (4x, 10x, 40x, 100x).
- Total magnification power is calculated by multiplying the magnification of the eyepiece and objective lens.
- The illuminator provides a source of light. The light is focused by the condenser and passing through the specimen placed on the stage. The light is then collected and formed into an image by an objective lens. We see the magnified images through the eyepiece.
- A clear image needs perfect focusing by adjusting the coarse and fine focus knobs.
- Iris Diaphragm and Abbe condenser are essential for clear images of high magnification.