
In this article, we will review the structure of a stereo (dissecting) microscope and explain to you how each part works to give us the magnified 3-D views. We will also guide you to use it step-by-step. There are some great ideas of what to look at under a stereo microscope as well.
This article covers
What is a stereo microscope and its application
Stereo microscopes (also called Dissecting microscope) are branched out from other light microscopes for the application of viewing “3D” objects. These include substantial specimens, such as insects, feathers, leaves, rocks, sand grains, gems, coins, and stamps, etc. Functionally, a stereo microscope is like a powerful magnifying glass. Unlike a compound microscope that offers a flat image, stereo microscopes give the viewer a 3-dimensional image that you can see the texture of a larger specimen.
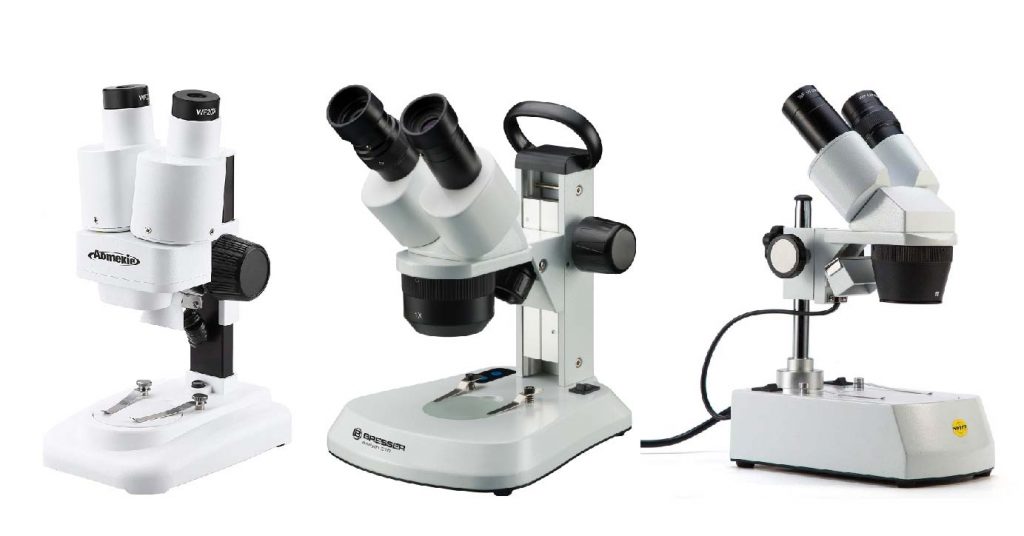
[In this image] Examples of Stereo & Dissecting microscopes.
Major microscope brands (Zeiss, Olympus, Nikon, Amscope, Omano, Leica …) all produce stereomicroscopes.
Photo source: AOMEKIE, Bresser, Swift
The name “stereo” comes from the term “stereoscopic,” meaning, viewing by two different angles to create an impression of depth and solidity. Because of this, true stereo microscopes only come in Binocular and Trinocular styles. This type of microscope can provide a long working distance to accommodate larger objects and allow users to manipulate the objects under microscopic views. You may find many applications such as dissecting, micro-surgery, miniature manufacturing, and micro-engraving. This is why it is also named “Dissecting microscope”.

[In this figure] The anatomy of compound microscope vs stereo (dissecting) microscope.
How do stereo microscopes work?
The working principle of Stereomicroscopy depends on two light paths traveling through the objectives and ocular lenses. Each light path provides a different angle (usually between 10 and 12 degrees) of viewing in each of our eye. Our brain processes these two very similar, but with slightly different angles, images into a three-dimensional vision.
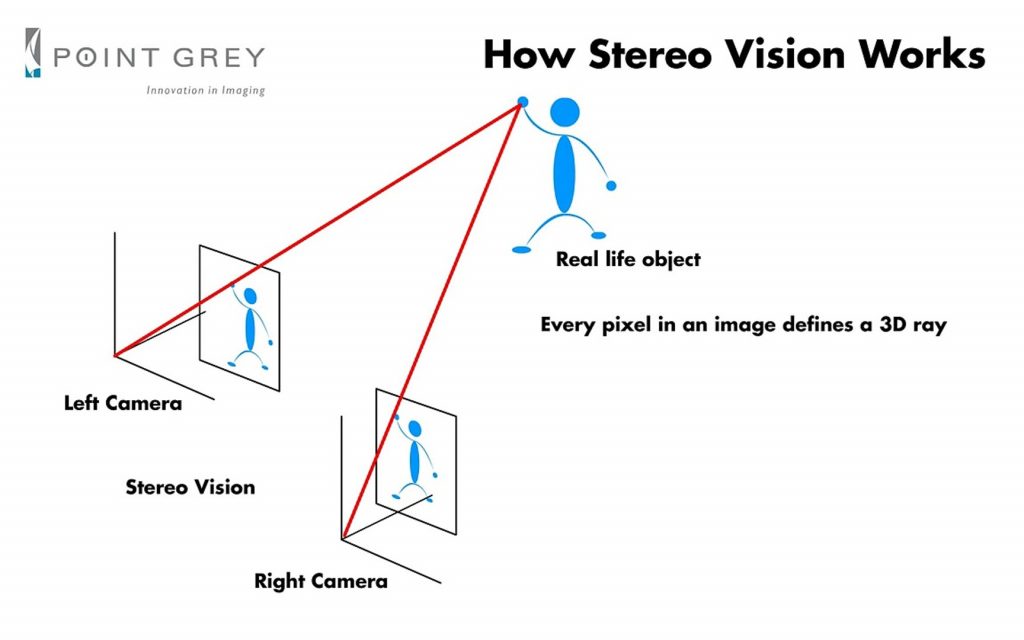
[In this image] The concept of 3-D vision is the same in both 3-D movies and stereo microscopes. The key is presenting two images with a slightly different angle to our brain.
Photo source: dailymotion
Also see: Greenough vs. Common Main Objective-style of dissecting microscopes
The difference between Compound and Stereo (Dissecting) Microscope
Unlike a compound microscope that can only see a very thin specimen, stereo microscopes can be used for viewing almost anything you can fit under them. However, stereo microscopes offer lower magnification, typically 5x-50x, comparing to compound microscopes. Below is an example showing the difference between viewing with compound vs stereo microscope.
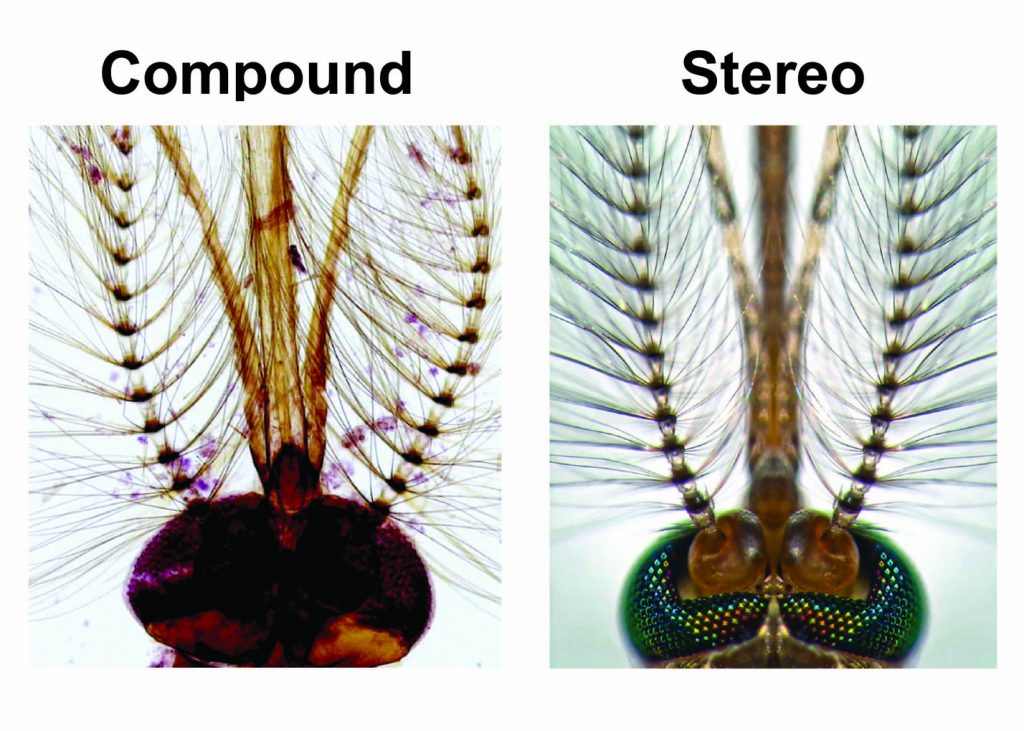
[In this figure] Looking mosquito head under compound and stereo microscopes.
A stereo microscope allows you to see the surface of specimens with a 3-dimensional view. Under a stereo microscope, you can see the metallic texture and colors of the mosquito’s compound eyes. In contrast, the light has to pass through the specimen to form the image under a compound microscope. In this case, the region of compound eyes is too thick to form a clear image.
Right Image credit: Dr. Gareth Paul Jones.
The characteristics of stereo and compound microscope
| Stereo microscope | Compound microscope |
| Two separate objectives | Single objective |
| Two separate optical paths | Single optical path |
| Imaging by light reflected from the object | Imaging by light transmitted through the object |
| Working with thick, solid specimens | Requiring thin, sectioned specimens |
| Typical magnification range between 5x -50x | Typical magnification range between 40x – 1000x |
| 3D images | 2D images |
What can you see under a stereo microscope?
When you will need a stereo microscope? You will need a stereo microscope to view more substantial specimens. In addition, you don’t have to make a microscope slide for the stereo microscopes.
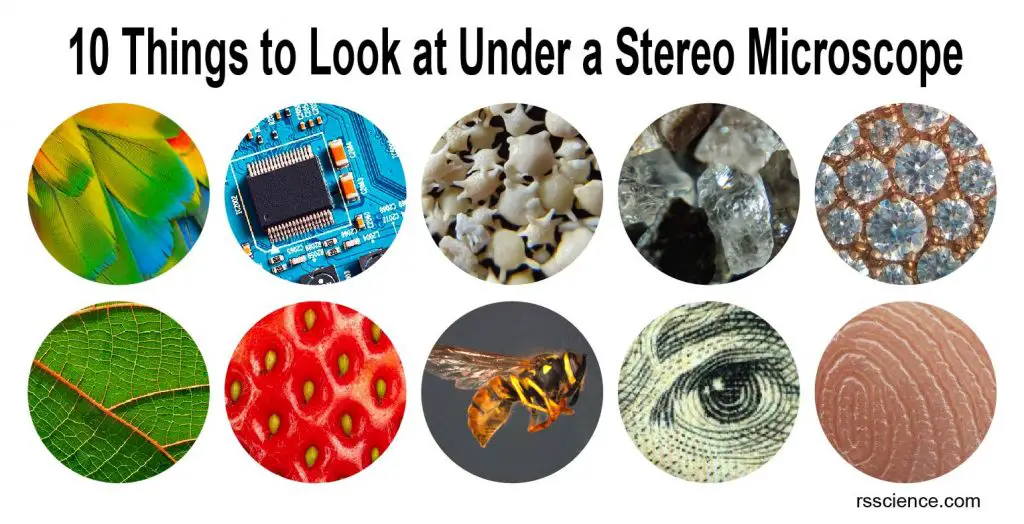
[In this image] Examples of objects imaged under a stereo microscope.
(Top row) parrot feather, circuit board, star sands, crystals, and jewelry. (Bottom row) leaves, strawberries, bees, bills, and fingerprints.
Uses of stereo microscopes
Due to their ability to view small things in 3D, stereo microscopes can be used in a variety of applications, especially when the operators need to see and manipulate tiny objects in real-time.
- Surgery – Precise microsurgery, especially operating in the brain, requires a medical stereomicroscope.
- Pathology – Pathologists use stereo microscopes to examine skin conditions.
- Biological research – Essential tools to aid in dissection and observation, for example, Entomology and Botany.
- Paleontology – Paleontologists use stereo microscopes when they clean and analyze fossils.
- Art and jewelry appraisal – Stereo microscopes can be used to evaluate the value of artworks.
- Manufacture and quality control – Stereo microscopes are used across all types of industry to check the quality of products, including looking for microfractures or for repairing circuit boards.
- Watchmaking – Stereo microscopes are useful in watchmaking due to the delicate nature and small size of components.
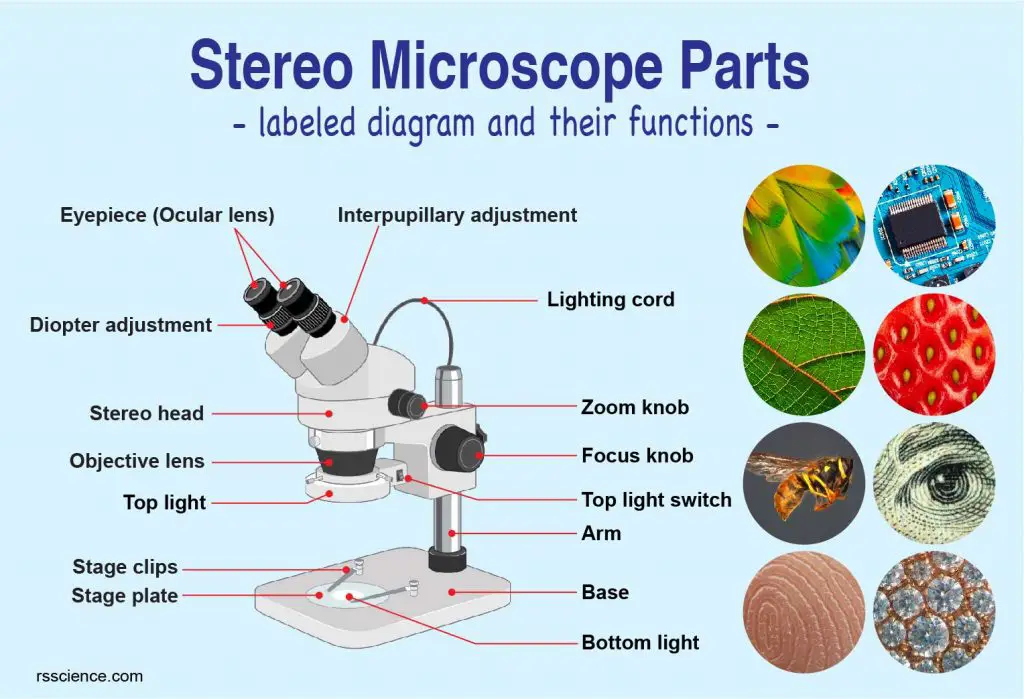
Labeled part diagram of a stereo microscope
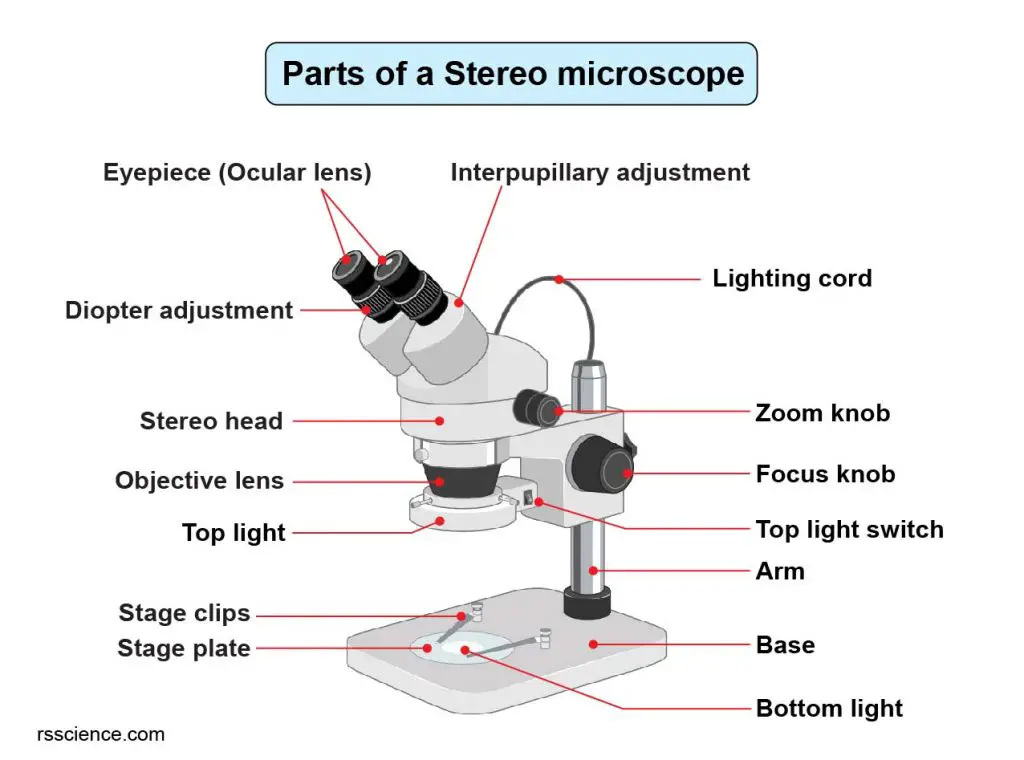
Major structural parts of a stereo microscope
There are three major structural parts of a stereo microscope.
- The viewing Head includes the upper part of the microscope, which houses the most critical optical components, including the eyepiece, objective lens, and light source of the microscope.
- The Base acts as the foundation of microscopes and the place to hold the specimens.
- The Arm connects between the base and the head parts as the backbone.
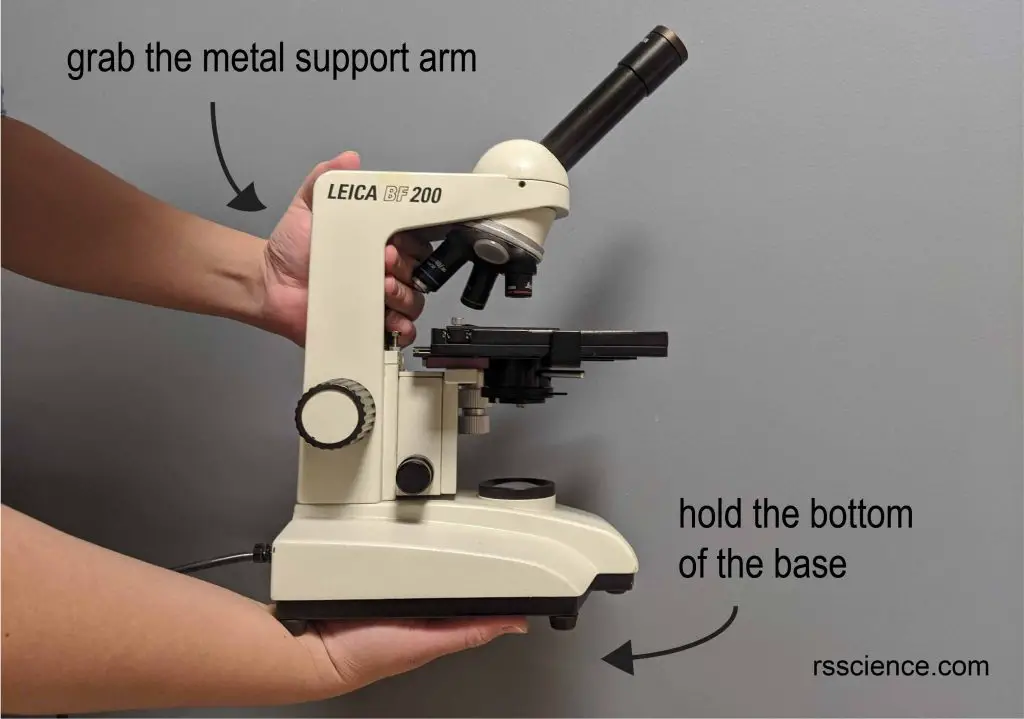
Note: When carrying a microscope, please always lift it by holding both the arm and base simultaneously, like the image below.
Optical components of a stereo microscope – definition and function
Optical parts of a stereo microscope work together to magnify and produce a 3-D image of the specimens. These parts include:
Eyepieces
The eyepiece (or ocular lens) is the lens part at the top of a microscope that the viewer looks through. Typically, standard eyepieces for a dissecting microscope have a magnifying power of 10x. Optional eyepieces of varying powers are available, typically from 5x-30x.
Apart from magnification, some eyepieces come with the label “WF” which defines that the eyepiece provides a wide field of view. This means that while viewing the specimen, the user will see wider areas compared to the field of view perceived using other eyepieces. Some of the most common field numbers are 18 and 20mm. While neither increases the magnification nor the resolution, the wider field of view allows the user to see more.
To have a 3-D view, stereo microscopes only come in Binocular and Trinocular styles. There is no Monocular stereo microscope.
Note: Although ocular and objective lenses can also be found in a compound microscope, it’s not possible to exchange these optical components between compound and stereo microscopes because of differences in diameter and design.
Eyepiece tube
The eyepiece tube holds the ocular lenses at the right place that aligns perfectly with the objective lenses.
Diopter adjustment ring
The eyepieces of binocular microscopes typically have a diopter adjustment ring that allows for correcting the inconsistencies in vision between your two eyes. By adjusting it, both eyes can see a clear image.
[In this image] Adjust the diopter rings to compensate for the difference in vision between right and left eyes.
Photo source: Nikon
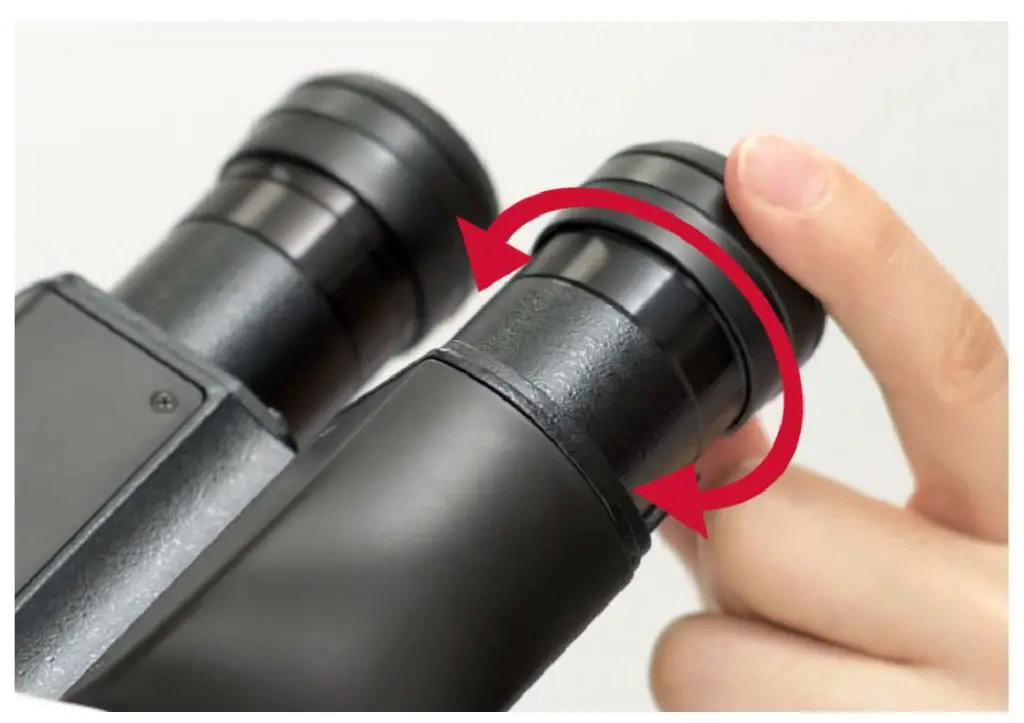
Interpupillary Adjustment
Binocular microscopes should also swivel (Interpupillary Adjustment) to allow for different distances between the eyes of different individuals.
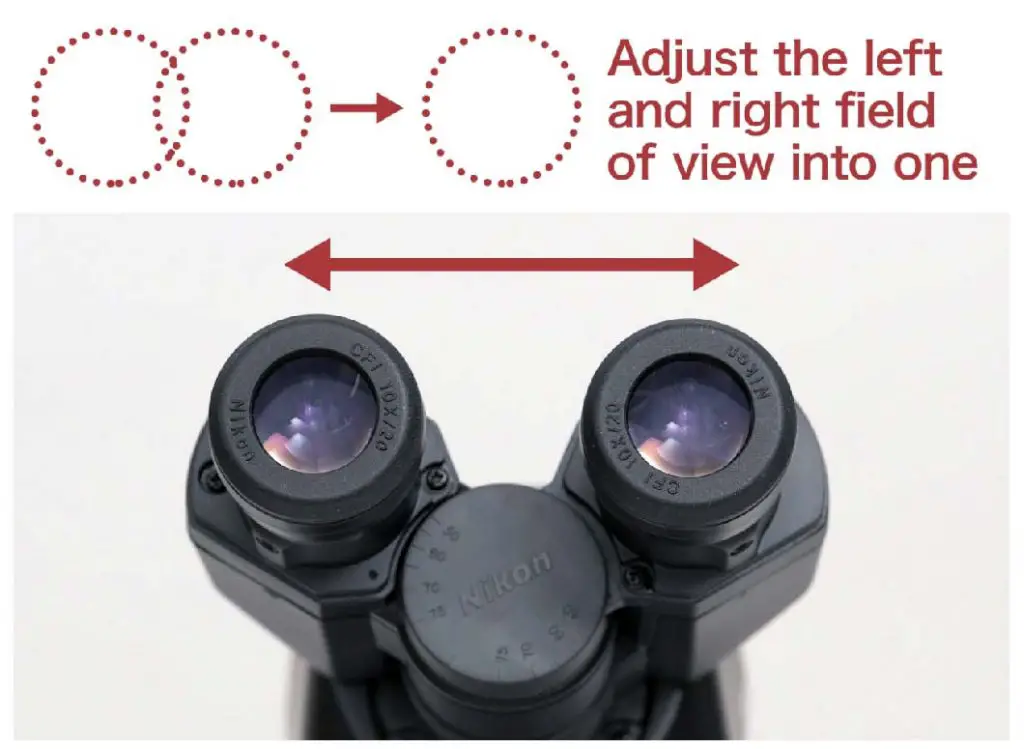
[In this image] To avoid fatigue, adjust the space between the left and right eyepieces to your face. Look through the eyepieces, overlap the left and right fields of view to one.
Photo source: Nikon
Objective Lenses
Objective lenses are the primary optical lenses for specimen visualization on a microscope. Objective lenses collect the light passing through the specimen and focus the light beam to form a magnified image. The objective lenses are the most important parts of a microscope.
Compared to a compound microscope where the objectives attached to the nosepiece can be seen and identified individually (based on color bands and their respective labels), the objectives of a dissecting microscope are located in a cylindrical cone and, therefore, are not directly seen. For the stereo microscope that comes with multiple objective lens sets (fixed power style), the cylindrical cone can be turned to adjust the magnification (usually ranging from 1x to 5x).
Note: Total magnification can be calculated by multiplying the magnification power of the objective lens to the magnifying power of the ocular lens.
More details: Greenough vs. Common Main Objective
Inside the head of a stereo microscope, there are more optical components that we can’t see. Generally, there are two types of optical systems in stereo microscopes: the Greenough optical system and the Common Main Objective (CMO) optical system.
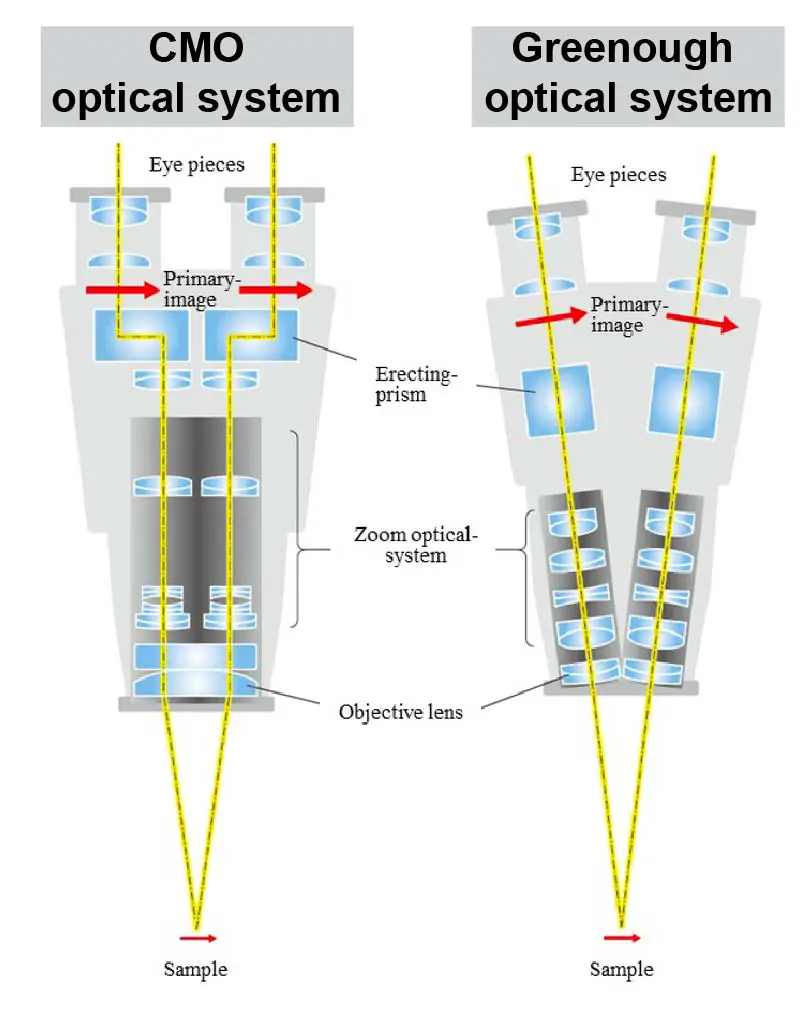
[In this image] The comparison of the Greenough and Common Main Objective (CMO) optical systems.
Photo source: Spie
Greenough-type stereo microscopes have two completely separate optical paths. There are two objective lenses to pair with the two eyepiece lenses in the cylindrical cone of stereo microscopes. Two lightpaths strike the object with a difference in angle of 15º. The human brain is able to generate a 3-D image through the optical path and the angular offset.
CMO or “Parallel style” stereo microscopes do not have double lenses; instead, the microscope has only one objective lens with a large diameter through which the light paths run for both the left and the right eye. This is why we called it “Common Main Objective”. Generally speaking, CMO style are more flexible, but also more expensive. This kind of microscope is better suited to microphotography than the Greenough microscope.
Barlow lens
In addition to the objective lenses, some dissecting microscopes can accept accessories like Barlow lenses. Essentially, Barlow lenses are auxiliary lenses that can be used to increase or decrease the total magnification.
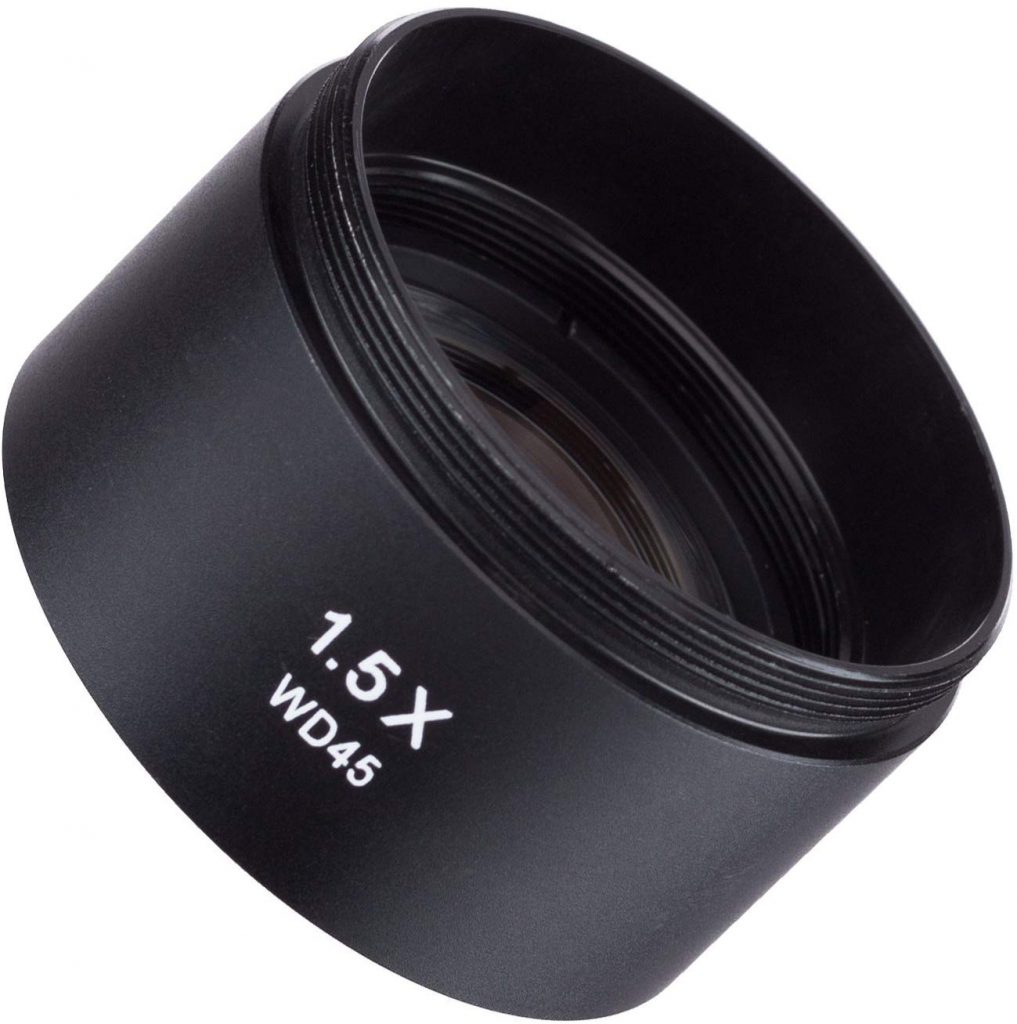
[In this image] A 0.5x Barlow lens that enlarges the field of view and increases working distance.
Photo source: Omax
For instance, a Barlow lens with a magnification power of 2x increases the overall magnification by two folds. On the other hand, a Barlow lens of 0.5x decreases the total magnification but increases both the working distance and the field of view, which could be useful for certain circumstances.
This accessory can be easily installed on a dissecting microscope by simply mounting it into the threaded lens port (in the cylindrical cone that contains the objectives).
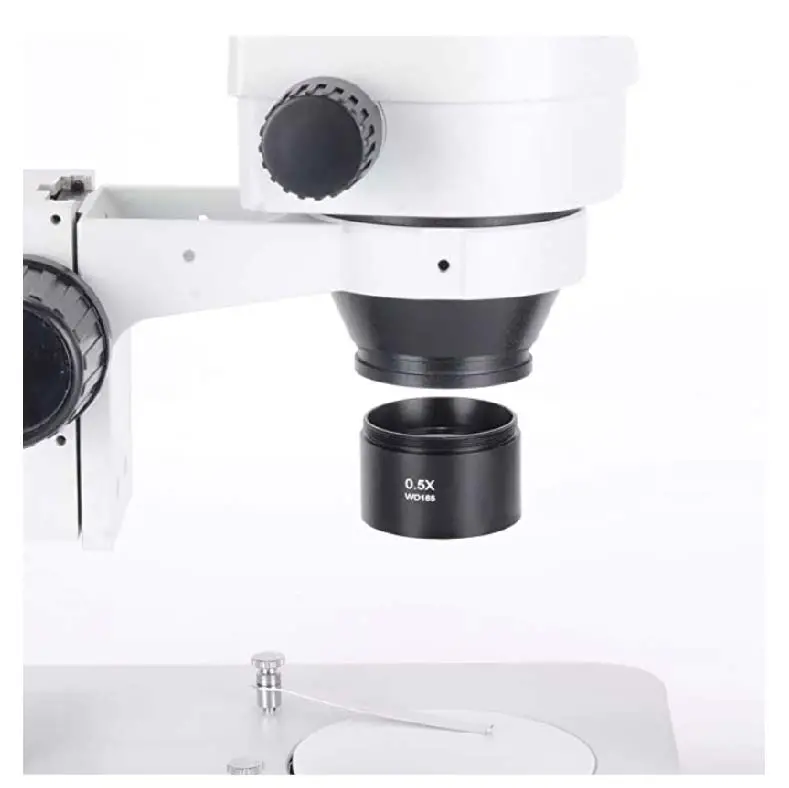
[In this image] Install a Barlow lens in front of the objective lens.
Photo source: Amazon
Adjustment Knobs
There are two kinds of adjustment knobs on a dissecting microscope:
Focus Knob
By turning this knob (also known as the coarse knob), the microscope head (and thus the objectives) can be raised or lowered, bringing the image into focus. Usually, the microscope head moved up and down on the arm track. This feature is particularly common at the front part of a rigid arm.
Zoom Knob
The zoom knob is usually located on both sides of the microscope head just below the eyepieces. By turning the zoom knob, we can zoom in on to a particular area to get a closer view.
While using the zoom knob, the focus distance may be affected. For this reason, the user may have to re-adjust the focus knob in order to bring the image into focus.
Light sources
Depending on the usage of microscopes, some dissecting microscopes only have overhead lighting while others have both overhead and stage light sources. There are light switches and intensity control to adjust the light and thus increase or decrease brightness and increase contrast, etc.
Sometimes, an external fiber optical lighting source will be used to control the illumination from a particular direction. It is useful for microsurgery and dissecting.
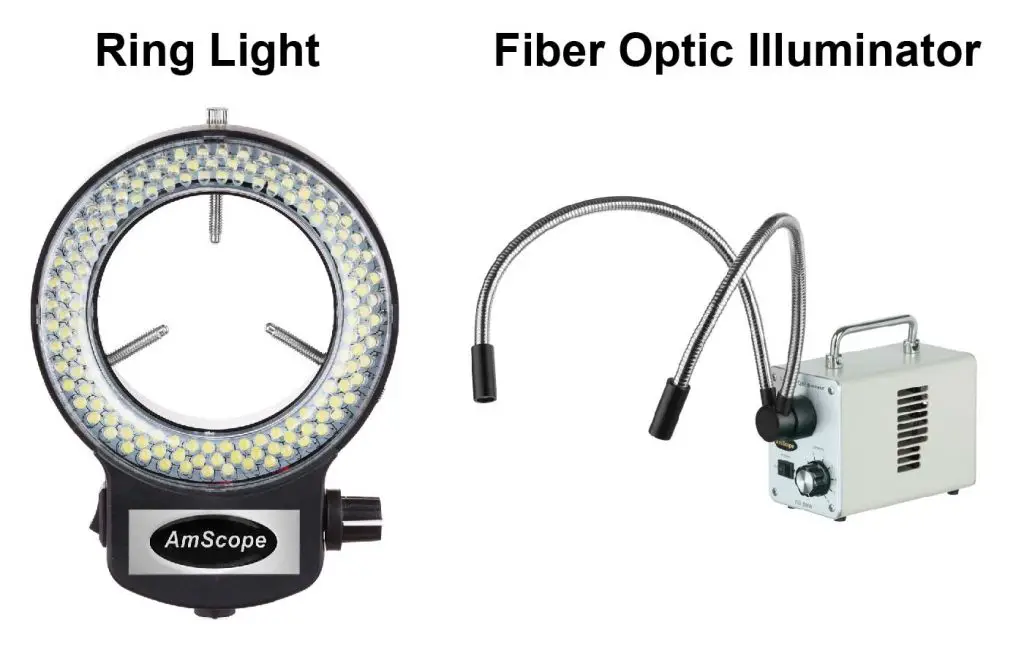
[In this image] Two common lighting accessories of dissecting microscopes.
(Left) A ring light is commonly used as the overhead light source. (Left) Fiber optical microscopic illuminator can point the light from a selected direction/angle.
Photo source: AmScope, AmScope
Stage plate
Stage plate locates under the objective lens. It is where the specimen is placed for viewing. Some stereo microscopes have reversible black and white stage plates to provide appropriate contrast with the specimen being viewed.
Stage chips
Stage clips help to hold the slides or other thin objects in place on the stage.
If you would like to learn optical components of a compound microscope, please visit Compound Microscope Parts – Labeled Diagram and their Functions, and this article.
How to use a stereo (dissecting) microscope
Follow these steps to put your stereo microscopes in work:
1. Set your microscope on a tabletop or other flat sturdy surface where you will have plenty of room to work.
2. Plug the microscope’s power cord into an outlet, making sure that the excess cord is out of the way so no one can trip over it or pull it off of the table.
3. Switch on the light sources. For microscope slides or other transparent objects, bottom lighting will work best. If the specimen you are viewing is opaque or solid (light cannot pass through it from below), use top lighting so that the light can reflect off the specimen’s surface.
4. Place your specimen at the center of the stage plate. If your specimen is thin and flat, try to secure it by using the stage clips. If your specimen is larger than the stage plate, you might need to turn the stage clips out so that they are hanging off the stage giving you more room to work.
5. For light-colored translucent specimens such as crystals, use either the black side of the stage plate (if it is reversible) or a piece of dark-colored construction paper to provide contrast.
6. Adjust the eyepieces (Diopter adjustment ring and Interpupillary Adjustment) so that you can look through the microscope comfortably.
7. If your stereo microscope has a rotating objective turret (for fixed-power microscopes), turn it to the objective you want to use. To determine the magnification of your microscope, multiply the magnification of the eyepiece lens by that of the objective lens. For example, the total magnification for 10x eyepiece and 2x objective lenses is 20x (10*2). Usually, starting from low magnification for a wider view is suggested.
8. If you are using a zoom-power dissecting microscope, turn the zoom knob to a suitable magnification (also put the field of view and the working distance into consideration).
9. While looking through the eyepieces, slowly turn the focus knob until the specimen comes into view. Once you can see the outline of the specimen, turn even more slowly to focus as sharply as possible. If you aren’t able to see anything, try moving the specimen around slightly on the stage plate to make sure it is directly below the objective lens, and then try focusing again.
10. Once you have focused on the specimen, you can move it around to see its other parts. You may have to re-focus slightly on each new area. If you change the zoom, you may need to re-focus as well.
11. When you are finished using your microscope, turn off the switch, remove the specimen, unplug the power cord, and cover the microscope with its dust cover. Store your microscope in a suitable place.
[In this video] Stereo Microscopes: Tips and Tricks.
Scientific ideas for using a stereo microscope
The suggestions below are just a few things you can view with your stereo microscope.
Note: Petri dishes are great for viewing live or messy objects under a stereo microscope.
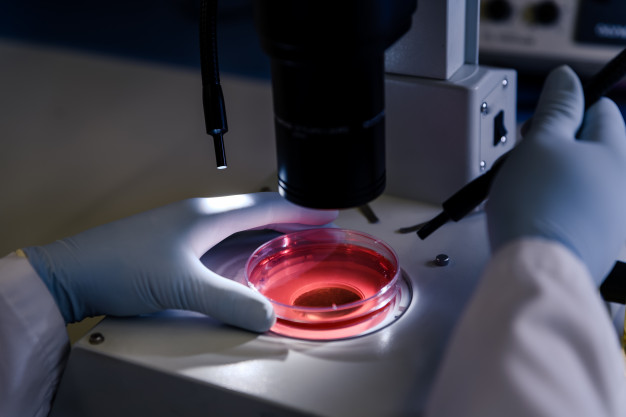
[In this image] Researcher examines engineered tissues growing in a dish filled with nutrient medium.
1. Study the habits of live insects
Collect insects in a petri dish and cover it with its lid to keep insects from escaping. Remember: don’t harm them.
[In this video] How to observe insects with a stereo microscope
2. Study a drop of pond water to look for microorganisms
Collect water samples from a scam or pond bottom. Some bigger microorganisms ideal to look for are daphnia (water fleas), copepods, tardigrades (water bears), flatworms, hydra, and young aquatic insects. Watch them closely as these tiny creatures swim, dive, and eat.
3. Hatch brine shrimp eggs
Brine shrimps are commonly hatched from eggs as food for small fishes. You can find it in any aquatic store.
[In this video] How to raise baby brine shrimps
4. Examine a soil/sand sample to see the different materials that comprise it
Soils with a lot of sand or clay are particularly interesting to look at. You might even want to collect soil/sand samples from several different spots and compare what you see.
5. Compare the types of minerals and crystals in different rock specimens
You can break off small pieces of larger rocks by knocking them together or using a rock pick.
6. Dissect a flower to learn about the beauty of all its parts
Carefully dissect each part of a flower with needles and tweezers. If there was a lot of pollen on the flower, try collecting the pollen into a petri dish and check it out with your microscope. Try the same with spores from ferns.
7. See what you are eating
Many fruits and vegetables have unique and interesting structures and textures. Also, check out different seeds and grains.
8. Look for everyday things to learn their structures
Make a prepared slide of the feather, hair, thread, salt, sugar or something else by sticking it to a piece of clear tape and viewing the specimen side up. Also, check out soap bubbles and ice cubes in a petri dish. You will see the world in a microscopic way!
9. Hunt for stardust in your backyard
Every day, approximately 60 tons of dust from asteroids, comets, and other materials fall to the Earth. These tiny metallic, alien stones of various shapes, textures, and colors are known as micrometeorites. Micrometeorites typically have high iron content, meaning they are magnetic. You can find magnetic material (including potential micrometeorites) on the spot with a handheld magnet.
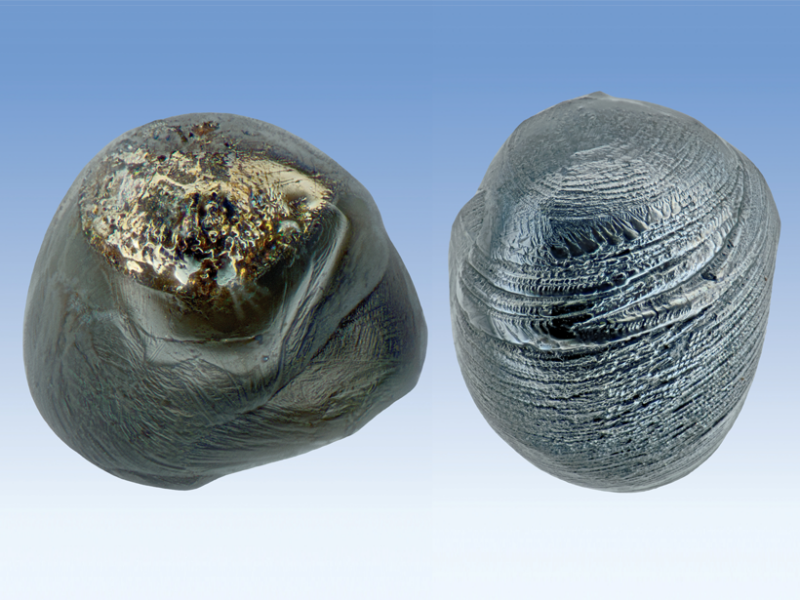
[In this image] Two micrometeorites (about 0.33 millimeters in size) found among the debris of urban areas by Jon Larsen of Project Stardust.
Photo source: Eos
Things to consider when choosing a Stereo microscope
1. What is your applications?
As we mentioned above, stereo and compound microscopes are quite different. Therefore, make sure your applications are suitable for stereo microscopes.
Stereo microscopes are particularly useful for biologists and medical doctors performing micro-dissections, technicians repairing circuit boards, paleontologists examining fossils, and anyone who needs to work with their hands or tools on small objects, but large enough to be seen or handled without the aid of a high power compound microscope. Thus, stereo microscopes have a very broad set of potential applications across many industries.
2. What magnification do you need?
There are two main types of stereo microscopes based on magnification — fixed power and zoom power.
Fixed power stereo microscopes have a set number of fixed position objectives and offer only the magnification options listed on the objectives; nothing in between. They are easy to use (you don’t need to worry about focusing), but at the same time, lack flexibility. Sometimes, you may see a “Dual power” stereo microscope. It means a fixed power stereo microscope with two levels of magnification (commonly, 10x/30x or 20x/40x). Simply rotate the objective housing to click into the desired level of magnification. The dual power microscopes are excellent starter microscopes with more affordable prices, without sacrificing optic quality.
On the other hand, zoom power stereo microscopes have much greater flexibility because the objective lenses can be moved closer or farther from the specimen. This allows a range of magnification options within the maximum and minimum values of the microscope, such as 6.5x through 45x. They require finer levels of refocusing when changing magnification values, therefore, making it a bit harder to use but offering much greater flexibility in terms of how much working distance, magnification, and field of view.
3. Do you need microphotography?
Generally, stereo microspecies designed with Common Main Objective (CMO) optical system work better with cameras.
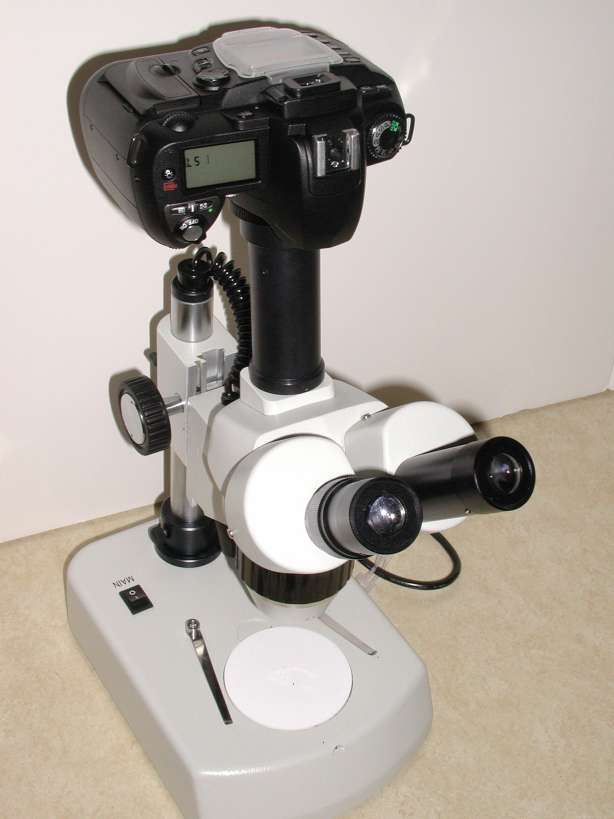
[In this figure] Mounting a Nikon D70 DSLR camera to a stereo microscope.
4. Considering a digital microscope as an alternative.
Digital (or USB) microscopes offer convenience and high-quality images. Functionally speaking, digital microscopes give you images similar to the ones from traditional stereo microscopes. These digital microscopes also have great advantages for outdoor and field studies.
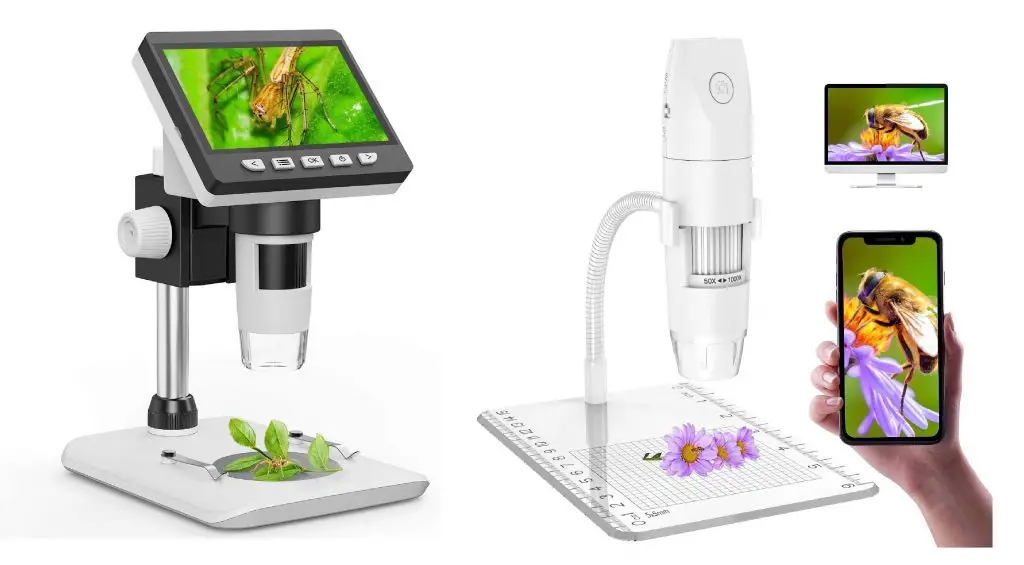
[In this figure] Examples of commercial digital (or USB) microscopes.
Photo credit: Amazon.
5. Other considerations
Like choosing compound microscopes, pay attention to the seller’s customer service and repairs policy when you purchase stereo microscopes.
Summary
In this article, we reviewed the function, principle, and parts of a stereo (dissecting) microscope. Here are some key points:
- Stereo microscopes allow us to view tiny objects with a three-dimensional vision. They are useful to observe thick, solid specimens for the surface textures.
- Stereo microscopes use two light paths to create an impression of depth and solidity. There are two major designs: Greenough vs. Common Main Objective optical systems.
- The magnification of stereo microscopes is lower than that of compound microscopes. The range commonly goes from 10x to 50x.
- Total magnification power is calculated by multiplying the magnification of the eyepiece and objective lens used.
- Based on how to adjust the magnification, stereo microscopes divide into fixed power and zoom power styles.
- Barlow lens is a common accessory that can be added to increase or decrease the magnification.
- Illuminators can provide light sources from both tops, bottom, and side directions. The choice depends on applications.
References
“Introduction to Stereomicroscopy”
“Stereo Microscopes: Greenough vs. Common Main Objective”
“Are normal stereo microscopes suitable for high-quality photographic documentation?”
“Up On The Roof, A Handful Of Urban Stardust” by Lauren J. Young